- Posts: 4
- Joined: Mon Aug 13, 2018 12:21 pm
- Real Name: Stuart Greentree
![]() Mon Aug 13, 2018 1:56 pm
Mon Aug 13, 2018 1:56 pm
I have around 100 avi files I wish to edit, but cannot import them into DaVinci Resolve 15 (free version on Windows 10). These video files were captured from MiniDV. I can import other video formats, such as MP4 from a gopro without issue.
I note there are other threads discussing this, but there isn't a 'best practice' methodology even a novice could follow.
Additionally, DaVinci Resolve 15 will not 'capture' directly from a MiniDV camcorder over firwire - i.e. the capture feature is greyed out, so cannot be imported in DaVinci Resolve 15 via direct capture method.
Noting I have already captured the files directly from my MiniDV camcorder (original tapes created on Canon and Sony camcorders). I captured these video files using a camcorder over firewire connection and another program (Cyberlink Power Director 16 on Win 10) as that still supported MiniDV capture.
The process of capturing so many old MiniDV tapes is lengthy process; capturing MiniDV content from a camcorder over firewire is performed at 1:1 speed. So I have about 100 files, each between 1 and 1.5 hours. The Cyberlink software was not reliable enough to find scenes and separate, so I have very long videos!
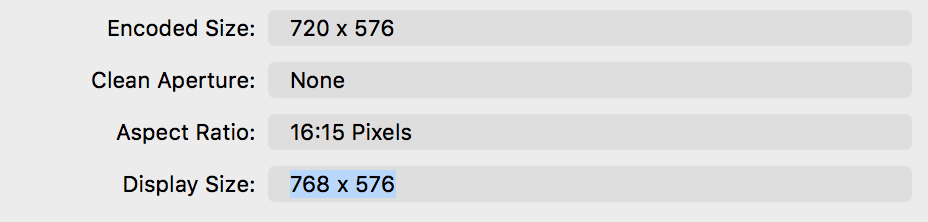
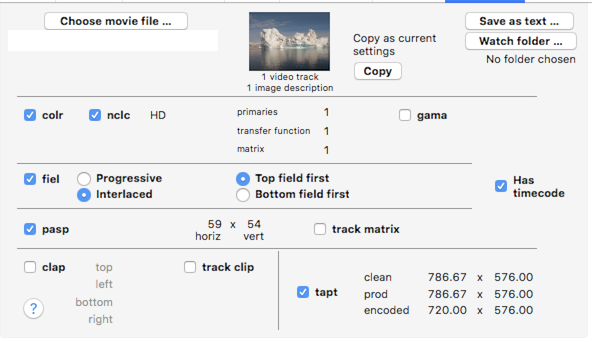
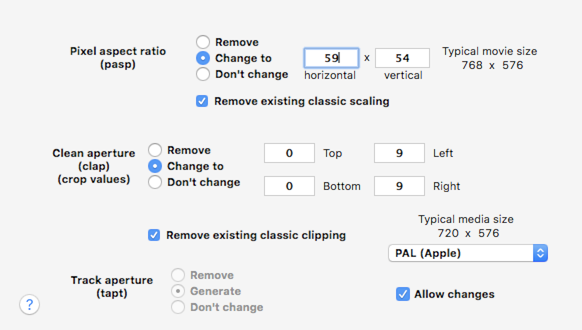
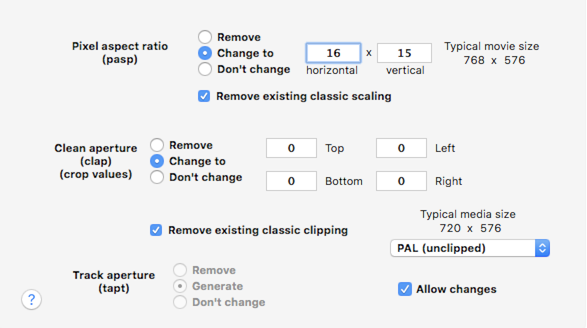
The files were saved using the original / unaltered file format as defined by the tape, which results in AVI files on the PC (i.e. retains the original MiniDV standards). Some older tapes were shot in 4:3 and some in 16:9. The region is PAL and 25 frames per second. The file resolution is 720 x 576. Data rate 28883kbps, Audio is 1024kbps, stereo and 32.000khz sampling.
Each file now plays well on Windows 10 using various sofware (players). Each file is therefore the original tape length of around 1 to 1.5 hours long and each file ends up between 10gb to almost 20 GB in size.
I have read other threads/posts on this topic but it is unclear the best way forward. I read discussions about 'rewrapped' Mov files using FFMPEG and so on. Obviously with so many files I am asking for the 'best practice' method/s to handle and edit these files without getting it wrong. Sure, these files are in a very old format, but typically they will carry great sentimental value to their creator. Also getting it wrong could be very time consuming, cause video quality loss, create compatibility issues and so on.
Introducing further video quality losses or dropped frames etc is unacceptable. I am happy to convet (upscale) the video to a new resolution, such as 1080p and so on. If upscaling, I am uncertain of when the upscaling steps should be performed (i.e. before or after editing).
I have read AVI is an older 'container' file. I read in another thread someone was able to simply modify the container so it was a .mov file. Other threads suggest converting the file using software, lines of code, drivers and so on. Other suggest another software program will achive this, but these threads are also for older versions of the software, so this info needs consolidating.
I feel there needs to be a single, definitive thread covering the MiniDV / AVI importing issue and would like a thread that provides a complete list of compatibility issues, capturing solutions, converstion recomendations, importing methodologies, tips, tricks and other recommendations that would constitue 'best practice' that a novice could follow.
So too some specific questions:
1) Is there a way for DaVinci Resolve to capture video directly from MiniDV camcorders?
2) For already captured AVI files (captured externalk to DaVinci Resolve) is there any way the AVI file format be imported 'as is', and without quality loss or conversion to another file format?
3) If the answer to 2 is 'no', then what is the recommended method for importing AVI files - e.g. adding a codec, converting to another format, altering the file name in some way and so on?
4) If converting AVI to another file format is essential, then what is the BEST file format to use for editing in DaVinci Resolve? (assuming Pal, 720 x 576, 25fps, interlaced etc) to maintain the video quality?
5) What additional steps might need to be taken when importing an AVI converted to another file format in DaVinci Resolve?
6) If upscaling the video to a higher resolution is desired, should the video be captured and edited at the native resolution of 720 x 576 and then upscaled, or upscaled first, then edited?
7) What other tips or tricks are worth knowing for handling the MiniDV/AVI file format within DaVinci Resolve?
I note there are other threads discussing this, but there isn't a 'best practice' methodology even a novice could follow.
Additionally, DaVinci Resolve 15 will not 'capture' directly from a MiniDV camcorder over firwire - i.e. the capture feature is greyed out, so cannot be imported in DaVinci Resolve 15 via direct capture method.
Noting I have already captured the files directly from my MiniDV camcorder (original tapes created on Canon and Sony camcorders). I captured these video files using a camcorder over firewire connection and another program (Cyberlink Power Director 16 on Win 10) as that still supported MiniDV capture.
The process of capturing so many old MiniDV tapes is lengthy process; capturing MiniDV content from a camcorder over firewire is performed at 1:1 speed. So I have about 100 files, each between 1 and 1.5 hours. The Cyberlink software was not reliable enough to find scenes and separate, so I have very long videos!
The files were saved using the original / unaltered file format as defined by the tape, which results in AVI files on the PC (i.e. retains the original MiniDV standards). Some older tapes were shot in 4:3 and some in 16:9. The region is PAL and 25 frames per second. The file resolution is 720 x 576. Data rate 28883kbps, Audio is 1024kbps, stereo and 32.000khz sampling.
Each file now plays well on Windows 10 using various sofware (players). Each file is therefore the original tape length of around 1 to 1.5 hours long and each file ends up between 10gb to almost 20 GB in size.
I have read other threads/posts on this topic but it is unclear the best way forward. I read discussions about 'rewrapped' Mov files using FFMPEG and so on. Obviously with so many files I am asking for the 'best practice' method/s to handle and edit these files without getting it wrong. Sure, these files are in a very old format, but typically they will carry great sentimental value to their creator. Also getting it wrong could be very time consuming, cause video quality loss, create compatibility issues and so on.
Introducing further video quality losses or dropped frames etc is unacceptable. I am happy to convet (upscale) the video to a new resolution, such as 1080p and so on. If upscaling, I am uncertain of when the upscaling steps should be performed (i.e. before or after editing).
I have read AVI is an older 'container' file. I read in another thread someone was able to simply modify the container so it was a .mov file. Other threads suggest converting the file using software, lines of code, drivers and so on. Other suggest another software program will achive this, but these threads are also for older versions of the software, so this info needs consolidating.
I feel there needs to be a single, definitive thread covering the MiniDV / AVI importing issue and would like a thread that provides a complete list of compatibility issues, capturing solutions, converstion recomendations, importing methodologies, tips, tricks and other recommendations that would constitue 'best practice' that a novice could follow.
So too some specific questions:
1) Is there a way for DaVinci Resolve to capture video directly from MiniDV camcorders?
2) For already captured AVI files (captured externalk to DaVinci Resolve) is there any way the AVI file format be imported 'as is', and without quality loss or conversion to another file format?
3) If the answer to 2 is 'no', then what is the recommended method for importing AVI files - e.g. adding a codec, converting to another format, altering the file name in some way and so on?
4) If converting AVI to another file format is essential, then what is the BEST file format to use for editing in DaVinci Resolve? (assuming Pal, 720 x 576, 25fps, interlaced etc) to maintain the video quality?
5) What additional steps might need to be taken when importing an AVI converted to another file format in DaVinci Resolve?
6) If upscaling the video to a higher resolution is desired, should the video be captured and edited at the native resolution of 720 x 576 and then upscaled, or upscaled first, then edited?
7) What other tips or tricks are worth knowing for handling the MiniDV/AVI file format within DaVinci Resolve?