Jeff Kee wrote:Is this currently possible, or is there a way to access this with a script or plugin?
So you know, I have tried to use expressions, but there are too many values to pipe in my animations, but I've figured out how to simplify the process with nodes. I just need to access the value input/output of any node value.
Short Answer:Adding a Fusion "Modifier" to the animated attributes on your nodes might be just what you are looking for. Check out the Fusion 9 Tool Manual.pdf topics on Modifiers from page 753 - 789 for more details.
Longer Answer:If that isn't what you are after, a
far more complex of an answer to the question would be:
Your challenging mo-graph work might benefit from what are known as "wireless" connections in Fusion. This works by mapping certain types of attributes by drag and drop placement/connection from the node based flow area in Fusion into an "Attribute" slot on the individual node. The wireless connection linkage is then visible/accessible when you select the node and look at its attributes in the Tool view.
This wireless approach can be preferable
in some very specific unique circumstances vs making a spider's web of unmanageable node connection lines, or having a lot of really cryptic expressions that connect randomly to nodes strewn throughout your composite in a really counter intuitive fashion.
The wireless linking nodes that could be used with a Fusion composites are called:
- Wirelsss Link (wire) = Built-in
- Wireless Link 3D (Wi3D) = Free Fuse module downloadable from WSL Forum
- Wireless Link 3DMaterial (Wi3DMAT) = Free Fuse module downloadable from WSL Forum
(All of these wireless node based approaches work perfectly well in Fusion (Free) and Fusion Studio so there is no reason a user at any budget level couldn't take advantage of this technique.)
It is very project/artist skill level dependent though on which attribute linking approach is truly the most suitable + efficient for the Fusion composite you are working on. You'd only approach the wireless connection concept for certain important attribute style connections in a composite as ideally you want to keep as much of a Fusion composite as visually inspectable node connections.
")
Basically, you could add a wireless input node to the comp that would make an invisible connection link between the source object in the flow area that comes before the object you are animating/controlling or an output node like a Renderer3D node or a Saver node. TBH the options are only limited by your creativity.
- Code: Select all
{
   Tools = ordered() {
      Saver1 = Saver {
         CtrlWZoom = false,
         Inputs = {
            ProcessWhenBlendIs00 = Input { Value = 0, },
            Clip = Input {
               Value = Clip {
                  Filename = "Previews:/Fusion/WirelessBackroundNodeRender.0.png",
                  FormatID = "PNGFormat",
                  Length = 0,
                  Saving = true,
                  TrimIn = 0,
                  ExtendFirst = 0,
                  ExtendLast = 0,
                  Loop = 1,
                  AspectMode = 0,
                  Depth = 0,
                  GlobalStart = -2000000000,
                  GlobalEnd = 0
               },
            },
            CreateDir = Input { Value = 1, },
            OutputFormat = Input { Value = FuID { "PNGFormat" }, },
            ["Gamut.SLogVersion"] = Input { Value = FuID { "SLog2" }, },
            Input = Input {
               SourceOp = "WirelessLink1",
               Source = "Output",
            },
         },
         ViewInfo = OperatorInfo { Pos = { 825, 49.5 } },
      },
      WirelessLink1 = Fuse.Wireless {
         Inputs = {
            Input = Input {
               SourceOp = "Background1",
               Source = "Output",
            },
         },
         ViewInfo = OperatorInfo { Pos = { 715, 49.5 } },
      },
      Note1 = Note {
         Inputs = {
            Comments = Input { Value = "This composite shows how a wirelessLink node can be used to connect a Background node to a Saver node.\n\n", }
         },
         ViewInfo = StickyNoteInfo {
            Pos = { 440, -115.5 },
            Flags = {
               Expanded = true
            },
            Size = { 496.558, 125.998 }
         },
      },
      Background1 = Background {
         Inputs = {
            GlobalOut = Input { Value = 0, },
            Width = Input { Value = 3840, },
            Height = Input { Value = 1920, },
            ["Gamut.SLogVersion"] = Input { Value = FuID { "SLog2" }, },
            Type = Input { Value = FuID { "Corner" }, },
            TopLeftRed = Input { Value = 1, },
            TopRightRed = Input { Value = 0.206, },
            BottomLeftRed = Input { Value = 0.675, },
            BottomRightRed = Input { Value = 0.106, },
         },
         ViewInfo = OperatorInfo { Pos = { 440, 49.5 } },
      }
   }
}
An extra option for advanced Fusion users, is you could copy the node you want to make a wireless connection slot on from the flow area in Fusion into your clipboard copy buffer. Then you would paste that node data as a block of text into a programmer's text editor like BBedit (Mac) or Notepad++ (Windows) and start customizing things.
To be fully honest, this is a pretty demanding task the first few times you do this, so it is only suggested for a technically minded artists who want to go deep and have really fine control over their composites.With the node's block of text copied into your text editor, you can then insert a custom paragraph of text near the bottom of the node called a UserControl that looks a bit like this:
- Code: Select all
UserControls = ordered() {
  DataSource = {
    LINKID_DataType = "Image",
    INP_Default = 0,
    IC_ControlPage = 1,
    INPID_InputControl = "ImageControl",
    LINKS_Name = "DataSource",
  }
}
With wireless connections you are able to drag and drop a "parent" node onto the wireless connection slot you create on another node in your comp.
Then inside the "receiving" node the internal expressions you add will link to that wireless input slot and whatever is connected to the wireless input will automatically drive all the expressions in a nice and tidy fashion. This means you can have the expressions "containerized" inside the node and not have them get out of control and really messy.
This is a screenshot of a text+ node that had a custom wireless input connection added using the UserControls based approach I mentioned above. This screenshot shows the text content in the text+ field being driven by the node that is connected to the wireless input.
(The input connection slot on the node in this screenshot is called "MetadataSource" and it has a loader node as the input.)

- TextFromMetadata-drag-and-drop-connection.png (96.14 KiB) Viewed 7763 times
If you copy tons of versions of a node with a wireless connection slot on it into your composite, each node will work independently with the internal expressions you add and you only need to relink the single wireless input connection slot on a node to change the driver for all expressions. This can be a massively powerful technique in the hands of a power user.
With regular expressions (on a normal node) when you link to attributes between nodes using the + symbol things can get messy over time when you start building a "mega comp" over several days.
If you go the wireless route, you can have 2D wireless connections, and you can also add a Fusion 3D system based based wireless3D connections for objects, and materials too if you needed to do that in your motion graphics work.
Several example articles that show what a Fusion wireless connection approach looks like & how they work can be found here:
(As additional warning, this is a complex topic that is best explored only if you really enjoy exploring technical challenges like scripting and expressions.)
Rendering Text From Metadata Tagshttps://www.steakunderwater.com/wesuckless/viewtopic.php?f=6&t=1488Bryan Ray's excellent MultiMerge.fuse uses a Wireless Connection approach in the fuse to load the footage in a layer like stackhttp://www.bryanray.name/wordpress/mult ... ic-fusion/The Ancient but still relevant in this case User Controls reference notes from the Eyeon VFXPedia Archivehttps://www.steakunderwater.com/VFXPedia/96.0.243.189/indexd11b.html?title=User:Gringo/User_ControlsKristof on the We Suck Less forums made a very interesting Custom MainInput Thread as well on wireless inputshttps://www.steakunderwater.com/viewtopic.php?f=16&t=1083&p=8173Kristof on the We Suck Less forums also created an interesting Fusion Macro called "im_fitFrustum" that uses a wireless input style of connection to allow you to attach an image to a camera as an image plane.
Kristof's example macro is one of the best Fusion demos out there for learning about how the wireless input connection approach functions on nodes that operate inside of Fusion's 3D workspace which would be what you'd likely want to do when creating advanced motion graphics (in 3D) inside of Fusion.
im_fitFrustum Macro Usage:The im_fitFrustum macro creates a custom type of imageplane that allows you to connect a camera to the node using a drag and dropable "source" textfield on the node. This saves you from having to use or edit lots of expressions when switching camera views once you have animated the image plane.
Then add a Camera3D node to the comp. Leave the camera at its initial position in the 3D workspace and do not translate or rotate it.
Add a im_fitFrustum node to the comp. Select the node so you can edit the node's attributes in the Tool tab.
It might be a bit hard the first time you try this but you need to drag the Camera3D node from your flow area into the im_fitFrustum node's Source textfield in the Tool's tab. This will cause an editable image plane to appear in Fusion's 3D workspace.
Now you can map a texture map to the image plane by connecting the imagery to the im_fitFrustum node's green colored MaterialInput connection.
* * *
I hope this reply helps you discover some extra options you have to take control of how you build a node based composite in Fusion.
Regards,
Andrew Hazelden
P.S. As an extra tip, when you go to make expression based node connections in a stock copy of Fusion, don't forget to open up Fusion's
Preferences window and adjust the
Global and Default Settings> User Interface controls.
By default Fusion will collapse one node's attributes in the Tool view when you go to select another node to cut down on sprawl and visual clutter. If you turn off the "Auto control close tools" option in this preference window both nodes will stay visible in the Tools view when you expand them.
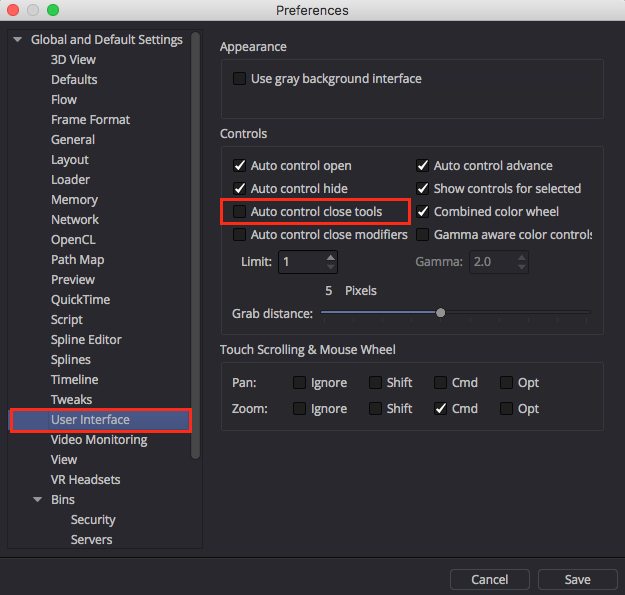
- Auto control close tools.png (86.07 KiB) Viewed 7763 times
Having both node's Tool sections open at the same time makes it easier to map regular expressions when you click the [+] icon and use the line dragging technique to "pick whip" an attribute name.
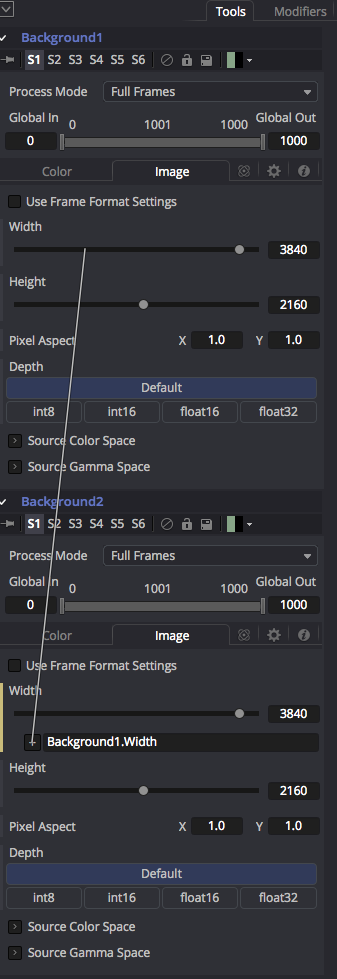
- pick whip dragging expression attribute names.png (95.83 KiB) Viewed 7763 times


