Blackmagic Design
- Posts: 2080
- Joined: Wed Aug 22, 2012 4:50 am
- Location: Melbourne, Australia
- Real Name: Hook
Hey guys,
I'm finally sharing my new LUTs i made for the Blackmagic 4K camera that have also been 'adapted' to work for the BMCC and Pocket Camera to be used inside of Resolve.
http://www.captainhook.co.nz/LUT_Hook_Mar2014/Hooks LUTs - Free.zip
Inside there's an installer for OSX that places them in the correct location, or for windows/linux users a folder with the .cube files to manually place in the correct location. The easiest way to do this manually is inside resolve in the project settings tab, go to the "Lookup Tables" tab and choose "Open LUT Folder" and copy the files to that location. Then choose "Update Lists".
I've also got some "gifts" for those who find these useful and would like to donate $10USD, in the form of a few "utility" powergrades (plus an 'experimental' LUT i've been working on to deal with IR contamination in Blackmagic footage) that i often use and are detailed further below. To Donate and get them, click here:

These were a long time in the making, and i would like to thank those who helped test and give me feedback while working on them!
___________________________
LUT INFO
-----------------------
I created these LUTs a little differently this time. The basis for these LUTs were created in the wonderful software "3D Lut Creator" by Oleg Sharonov. If you haven't heard of it, it's a very unique approach to creating LUTs that primarily uses a grid/mesh for mapping hue/saturation/luminance. It's still pretty new, but a really great visual way to approach colour correction. Check it out by visiting the Facebook page here (Official Site still coming):
https://www.facebook.com/groups/3dlutcreator/
After creating the initial 64^3 LUT in the OSX version of this app, i took it into Resolve and did further tweaking before and after the 'base' LUT to create the final versions.
There's two versions of each LUT this time. One is named 'BASIC'. This has the 3D Lut Creator LUT performing all the colour adjustments, but the official BMD LUTs (either the 4K version or BMDFilm version) for luminance. The luminance curves i did inside 3D Lut Creator were actually quite similar, but i decided that since the goal of the 'BASIC' LUTs were to give a very basic starting place to begin your grade, the official BMD LUT luminance curves were a better starting point.
The 'VIBE' version of the LUTs use the same 3D Lut Creator LUT at the 'heart', but use my own luminance curves and has other colour/saturation/etc adjustments on top. The purpose of this LUT is like my first one, to get a starting point for grading that is generally pleasing to me but as with the first one, it doesn't remove the need for grading but rather is to help speed up the grading process. I still recommend "prepping the image" for each clip prior to the LUT by adjusting WB and contrast/saturation to get the best from it, and making other adjustments post-LUT if it works for what you're trying to achieve. Keying for example tends to work better after the LUT node, but sometimes adding/removing saturation/contrast/etc after the LUT can produce more desirable results also.
My recommended workflow is to have 3 nodes for organisation, node #1 is for pre-LUT adjustments, node #2 contains the LUT, node #3 for post adjustments. Obviously this can be modified to preference, but for those newer to grading and looking to incorporate these LUTs i recommend starting there. I also detail further below how i approach WB/Tint for non-RAW material using a powergrade contained in the 'donation pack'.
___________________________
EXAMPLES
------------------------
Here's some examples of the various LUTs (i apologise for the image spam):
Blackmagic 4K
Blackmagic 4K - Flat (Straight from Cam)
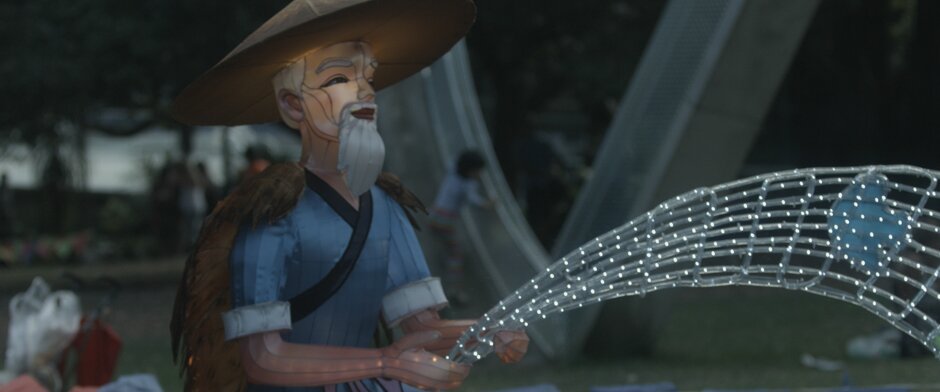
Blackmagic 4K - BM4KFilm 'VIBE' LUT

Blackmagic 4K - Flat

Blackmagic 4K - BM4KFilm 'VIBE' LUT

Blackmagic 4K - BM4KFilm 'BASIC' LUT

Blackmagic 4K - Flat

Blackmagic 4K - BM4KFilm 'VIBE' LUT
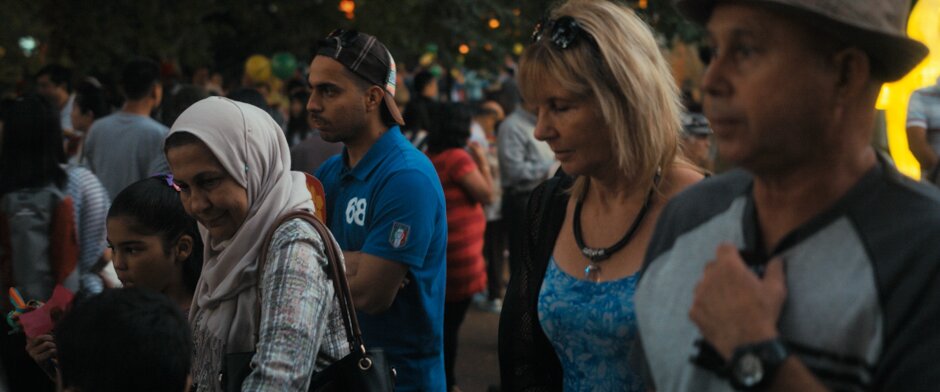
Blackmagic 4K - BM4KFilm 'BASIC' LUT

Blackmagic 4K - Flat (jpg shared by Kholi)

Blackmagic 4K - BM4KFilm 'VIBE' LUT (applied to jpg shared by Kholi)
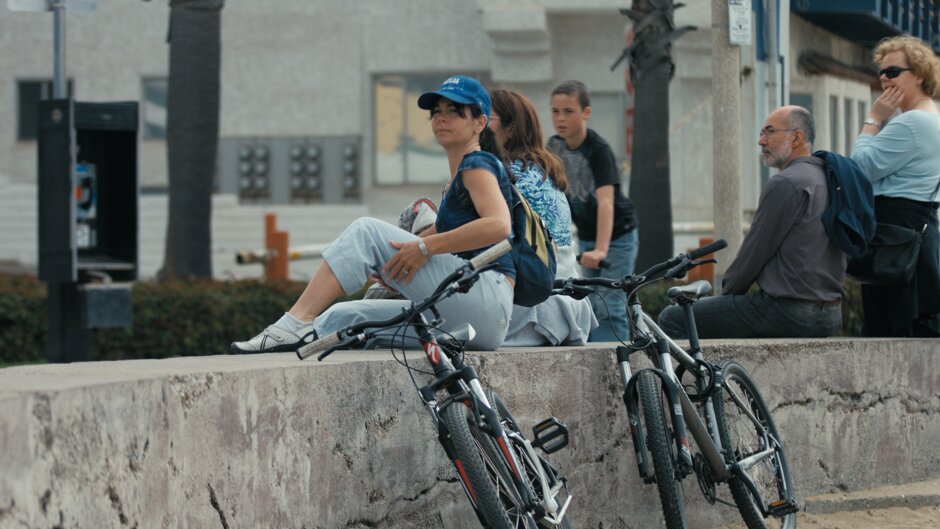
Blackmagic 4K - Flat (jpg shared by Kholi)
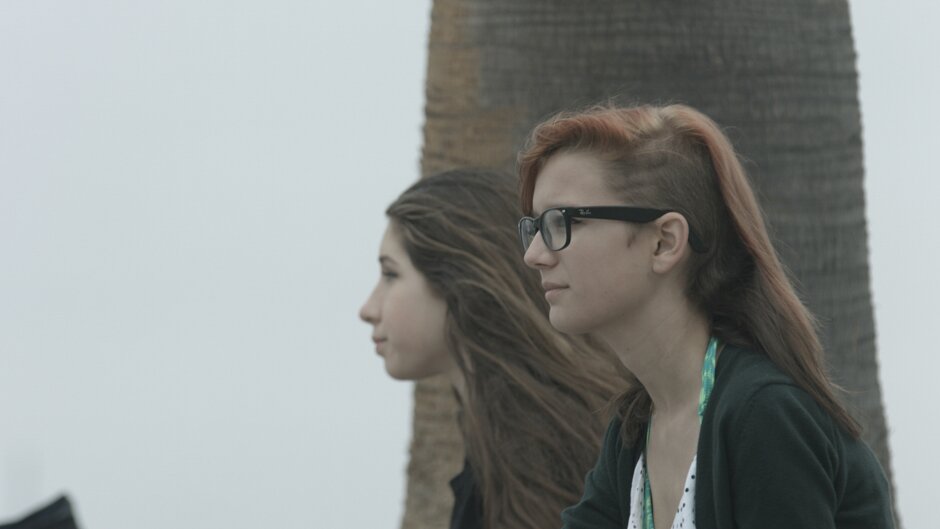
Blackmagic 4K - BM4KFilm 'VIBE' LUT (applied to jpg shared by Kholi)

Blackmagic Cinema Camera and Pocket Cam
BMDFilm - Flat

BMDFilm - BMDFilm 'VIBE' LUT + 20% IR cut LUT from 'donation pack'

BMDFilm - Flat

BMDFilm - BMDFilm 'VIBE' LUT + 20% IR cut LUT from 'donation pack'

BMDFilm - Flat

BMDFilm - BMDFilm 'VIBE' LUT + 20% IR cut LUT from 'donation pack'

BMDFilm - Flat

BMDFilm - BMDFilm 'VIBE' LUT + 20% IR cut LUT from 'donation pack'

BMDFilm - Flat (image by 4saken)

BMDFilm - BMDFilm 'VIBE' LUT (image by 4saken)

BMDFilm - Flat (image by 4saken)

BMDFilm - BMDFilm 'VIBE' LUT (image by 4saken)

BMDFilm - Flat (image by 4saken)

BMDFilm - BMDFilm 'VIBE' LUT (image by 4saken)

____________________________
DONATORS PACK
---------------------------
So here are some examples of using some of the powergrades that come with the 'donators pack'.
First is the set of WB "tools" i made for non-RAW images. These are a group of 4 nodes which all default to having the gain output in the "key" tab set to '0', in other words they have no effect on the image by default. These are intended to be used before any saturation is applied, or any LUTs etc. They're the first nodes of your node tree. The 4 nodes each push the image along one of 4 axis using curves, either towards cooler (2850K) or warmer (5500K) like a traditional WB slider, or towards green or magenta like a traditional "Tint" slider. I originally tried doing this via the RGB Mixer which i believe is the more "accurate" method, but i found it didn't match up very well to using the WB sliders of the RAW tab when adjusting Blackmagic RAW images. So these curves were made to more closely match those two sliders (or as close as i got them at the time). Also included is a "WB Tools + LUT Setup" powergrade. I use this a lot to setup my node tree, the LUT node has nothing applied, it's simply a holding place for me to choose the LUT i want to use. I also adjust curves/LGG/saturation/etc in this node as those operations are applied before the LUT in the same node within Resolve.
On to examples of using the WB tools:
BMDFilm - BMDFilm 'VIBE' LUT (image by 4saken) - As Shot - Clearly the WB is too "cool".

BMDFilm - BMDFilm 'VIBE' LUT and WB Tools (image by 4saken) - Here i've used my 5500K node and adjusted the gain output in the "key" tab to 1 (or 100% or "full"). I think i could actually duplicate this node and add a smaller amount again to the adjustment, but i think it shows just how far non-RAW footage can be pushed even when the WB is so far off.

BMDFilm - Flat (image by 4saken)

BMDFilm - BMDFilm 'BASIC' LUT (image by 4saken) - As Shot - Clearly the WB is too "warm".

BMDFilm - BMDFilm 'BASIC' LUT and WB Tools (image by 4saken) - Adjusting for an image shot in Tungsten and mixed lighting can be trickier. Here i used a combination of my 2850K node at 60% (0.6) to cool off the image, and then a overall Hue rotation just before the LUT.

And here's some examples using the other powergrades and LUTs on a frame from the 4K camera. These might be subtle in these small frames, so i recommend clicking on the images for the larger versions and comparing the images "stacked" in photoshop or similar to compare more easily.
Blackmagic 4K - Flat

Blackmagic 4K - BM4KFilm 'BASIC' LUT

Blackmagic 4K - BM4KFilm 'VIBE' LUT

Blackmagic 4K - BM4KFilm 'VIBE' LUT + Skin Map Powergrade.
This powergrade is based off a technique i used to do when retouching high-end beauty/fashion images. In photoshop one of the methods i used to reduce skin colour variation (something done very often with digital beauty images as film didn't tend to show so much colour variation) was to make a gradient map using a 'skin tone' colour in the middle, mask the area of the skin i wanted to apply it to, and lower the opacity to around 20%. The powergrade defaults to 20% also (0.2 in output gain) which you can adjust in the "Blend %" node. You can also adjust the skin key or tone nodes as desired.

Another thing i often did with fashion images was to desaturate using the blue channel. Because it also affects tone particularly skin, it was often a nice way to add density to skin and desaturate other parts of the image by varying amounts. This defaults to around 18% (0.18) in output gain. There's also 2 other powergrades that desaturate and saturate using luma vs sat curves that i often use as a starting point.

This one is my node tree that i start with for sharpening inside Resolve. It splits Chroma and Luma via the old method in Resolve 9, and applies sharpening to the luma only, but also restricted by a luma key that keeps the sharpening fixed more to brighter parts of the image, and leaves darker shadows areas that tend to have more noise alone so as to not exaggerate noise/grain (i do the opposite with NR and adding film grain scans by restricting them more to shadows than highlights).

Here's the result of my 'diffusion' node tree i currently use. Again, the amount can be easily blended in the appropriately named node, or settings in the "mist" node adjusted. This powergrade adds a bit of density at the same time, but i like the effect.

And finally, here's my experimental and VERY preliminary LUT to try address IR pollution on the Blackmagic cameras if not using a good ND/IR Cut like the new Hoya PROND's (see links below for Hoya comparisons to Tiffen IRNDs). I've found for Tiffen IRNDs on my Blackmagic footage, this LUT can help when used with a low output gain (as shown further above in some examples). Here the problem is shown extreme by using a 1.2ND Tiffen filter with NO IR Cut filter, and then after with my LUT set to 100% or "1" in the output gain. It's very important that this LUT is in the first node before ANY other corrections.
Blackmagic 4K - BM4KFilm 'VIBE' LUT - As Shot with NO IR Cut filter.

Blackmagic 4K - BM4KFilm 'VIBE' LUT + IR CUTTER LUT from the donators pack set to full/100%/"1". Not perfect, but a lot better starting place for grading than the before!! Obviously trying to solve this in post is far from ideal and is much better addressed by filtering, but i've found it useful all the same for certain footage i've shot, or supplied to me for grading.

Follow these links to see examples comparing the Hoya PRONDs to various Tiffen IRNDs:
Pocket Cam - http://www.bmcuser.com/showthread.php?6403-New-Hoya-ProNDs-Rolling-Report-Thread&p=97497&viewfull=1#post97497
4K Camera - http://www.bmcuser.com/showthread.php?6403-New-Hoya-ProNDs-Rolling-Report-Thread&p=108645&viewfull=1#post108645
Thanks again for the kind words and encouragement over the last (almost) year since releasing my first LUT, hope some of you find these ones just as useful!
I'm finally sharing my new LUTs i made for the Blackmagic 4K camera that have also been 'adapted' to work for the BMCC and Pocket Camera to be used inside of Resolve.
http://www.captainhook.co.nz/LUT_Hook_Mar2014/Hooks LUTs - Free.zip
Inside there's an installer for OSX that places them in the correct location, or for windows/linux users a folder with the .cube files to manually place in the correct location. The easiest way to do this manually is inside resolve in the project settings tab, go to the "Lookup Tables" tab and choose "Open LUT Folder" and copy the files to that location. Then choose "Update Lists".
I've also got some "gifts" for those who find these useful and would like to donate $10USD, in the form of a few "utility" powergrades (plus an 'experimental' LUT i've been working on to deal with IR contamination in Blackmagic footage) that i often use and are detailed further below. To Donate and get them, click here:

These were a long time in the making, and i would like to thank those who helped test and give me feedback while working on them!
___________________________
LUT INFO
-----------------------
I created these LUTs a little differently this time. The basis for these LUTs were created in the wonderful software "3D Lut Creator" by Oleg Sharonov. If you haven't heard of it, it's a very unique approach to creating LUTs that primarily uses a grid/mesh for mapping hue/saturation/luminance. It's still pretty new, but a really great visual way to approach colour correction. Check it out by visiting the Facebook page here (Official Site still coming):
https://www.facebook.com/groups/3dlutcreator/
After creating the initial 64^3 LUT in the OSX version of this app, i took it into Resolve and did further tweaking before and after the 'base' LUT to create the final versions.
There's two versions of each LUT this time. One is named 'BASIC'. This has the 3D Lut Creator LUT performing all the colour adjustments, but the official BMD LUTs (either the 4K version or BMDFilm version) for luminance. The luminance curves i did inside 3D Lut Creator were actually quite similar, but i decided that since the goal of the 'BASIC' LUTs were to give a very basic starting place to begin your grade, the official BMD LUT luminance curves were a better starting point.
The 'VIBE' version of the LUTs use the same 3D Lut Creator LUT at the 'heart', but use my own luminance curves and has other colour/saturation/etc adjustments on top. The purpose of this LUT is like my first one, to get a starting point for grading that is generally pleasing to me but as with the first one, it doesn't remove the need for grading but rather is to help speed up the grading process. I still recommend "prepping the image" for each clip prior to the LUT by adjusting WB and contrast/saturation to get the best from it, and making other adjustments post-LUT if it works for what you're trying to achieve. Keying for example tends to work better after the LUT node, but sometimes adding/removing saturation/contrast/etc after the LUT can produce more desirable results also.
My recommended workflow is to have 3 nodes for organisation, node #1 is for pre-LUT adjustments, node #2 contains the LUT, node #3 for post adjustments. Obviously this can be modified to preference, but for those newer to grading and looking to incorporate these LUTs i recommend starting there. I also detail further below how i approach WB/Tint for non-RAW material using a powergrade contained in the 'donation pack'.
___________________________
EXAMPLES
------------------------
Here's some examples of the various LUTs (i apologise for the image spam):
Blackmagic 4K
Blackmagic 4K - Flat (Straight from Cam)

Blackmagic 4K - BM4KFilm 'VIBE' LUT

Blackmagic 4K - Flat

Blackmagic 4K - BM4KFilm 'VIBE' LUT

Blackmagic 4K - BM4KFilm 'BASIC' LUT

Blackmagic 4K - Flat

Blackmagic 4K - BM4KFilm 'VIBE' LUT

Blackmagic 4K - BM4KFilm 'BASIC' LUT

Blackmagic 4K - Flat (jpg shared by Kholi)

Blackmagic 4K - BM4KFilm 'VIBE' LUT (applied to jpg shared by Kholi)

Blackmagic 4K - Flat (jpg shared by Kholi)

Blackmagic 4K - BM4KFilm 'VIBE' LUT (applied to jpg shared by Kholi)

Blackmagic Cinema Camera and Pocket Cam
BMDFilm - Flat

BMDFilm - BMDFilm 'VIBE' LUT + 20% IR cut LUT from 'donation pack'

BMDFilm - Flat

BMDFilm - BMDFilm 'VIBE' LUT + 20% IR cut LUT from 'donation pack'

BMDFilm - Flat

BMDFilm - BMDFilm 'VIBE' LUT + 20% IR cut LUT from 'donation pack'

BMDFilm - Flat

BMDFilm - BMDFilm 'VIBE' LUT + 20% IR cut LUT from 'donation pack'

BMDFilm - Flat (image by 4saken)

BMDFilm - BMDFilm 'VIBE' LUT (image by 4saken)

BMDFilm - Flat (image by 4saken)

BMDFilm - BMDFilm 'VIBE' LUT (image by 4saken)

BMDFilm - Flat (image by 4saken)

BMDFilm - BMDFilm 'VIBE' LUT (image by 4saken)

____________________________
DONATORS PACK
---------------------------
So here are some examples of using some of the powergrades that come with the 'donators pack'.
First is the set of WB "tools" i made for non-RAW images. These are a group of 4 nodes which all default to having the gain output in the "key" tab set to '0', in other words they have no effect on the image by default. These are intended to be used before any saturation is applied, or any LUTs etc. They're the first nodes of your node tree. The 4 nodes each push the image along one of 4 axis using curves, either towards cooler (2850K) or warmer (5500K) like a traditional WB slider, or towards green or magenta like a traditional "Tint" slider. I originally tried doing this via the RGB Mixer which i believe is the more "accurate" method, but i found it didn't match up very well to using the WB sliders of the RAW tab when adjusting Blackmagic RAW images. So these curves were made to more closely match those two sliders (or as close as i got them at the time). Also included is a "WB Tools + LUT Setup" powergrade. I use this a lot to setup my node tree, the LUT node has nothing applied, it's simply a holding place for me to choose the LUT i want to use. I also adjust curves/LGG/saturation/etc in this node as those operations are applied before the LUT in the same node within Resolve.
On to examples of using the WB tools:
BMDFilm - BMDFilm 'VIBE' LUT (image by 4saken) - As Shot - Clearly the WB is too "cool".

BMDFilm - BMDFilm 'VIBE' LUT and WB Tools (image by 4saken) - Here i've used my 5500K node and adjusted the gain output in the "key" tab to 1 (or 100% or "full"). I think i could actually duplicate this node and add a smaller amount again to the adjustment, but i think it shows just how far non-RAW footage can be pushed even when the WB is so far off.

BMDFilm - Flat (image by 4saken)

BMDFilm - BMDFilm 'BASIC' LUT (image by 4saken) - As Shot - Clearly the WB is too "warm".

BMDFilm - BMDFilm 'BASIC' LUT and WB Tools (image by 4saken) - Adjusting for an image shot in Tungsten and mixed lighting can be trickier. Here i used a combination of my 2850K node at 60% (0.6) to cool off the image, and then a overall Hue rotation just before the LUT.

And here's some examples using the other powergrades and LUTs on a frame from the 4K camera. These might be subtle in these small frames, so i recommend clicking on the images for the larger versions and comparing the images "stacked" in photoshop or similar to compare more easily.
Blackmagic 4K - Flat

Blackmagic 4K - BM4KFilm 'BASIC' LUT

Blackmagic 4K - BM4KFilm 'VIBE' LUT

Blackmagic 4K - BM4KFilm 'VIBE' LUT + Skin Map Powergrade.
This powergrade is based off a technique i used to do when retouching high-end beauty/fashion images. In photoshop one of the methods i used to reduce skin colour variation (something done very often with digital beauty images as film didn't tend to show so much colour variation) was to make a gradient map using a 'skin tone' colour in the middle, mask the area of the skin i wanted to apply it to, and lower the opacity to around 20%. The powergrade defaults to 20% also (0.2 in output gain) which you can adjust in the "Blend %" node. You can also adjust the skin key or tone nodes as desired.

Another thing i often did with fashion images was to desaturate using the blue channel. Because it also affects tone particularly skin, it was often a nice way to add density to skin and desaturate other parts of the image by varying amounts. This defaults to around 18% (0.18) in output gain. There's also 2 other powergrades that desaturate and saturate using luma vs sat curves that i often use as a starting point.

This one is my node tree that i start with for sharpening inside Resolve. It splits Chroma and Luma via the old method in Resolve 9, and applies sharpening to the luma only, but also restricted by a luma key that keeps the sharpening fixed more to brighter parts of the image, and leaves darker shadows areas that tend to have more noise alone so as to not exaggerate noise/grain (i do the opposite with NR and adding film grain scans by restricting them more to shadows than highlights).

Here's the result of my 'diffusion' node tree i currently use. Again, the amount can be easily blended in the appropriately named node, or settings in the "mist" node adjusted. This powergrade adds a bit of density at the same time, but i like the effect.

And finally, here's my experimental and VERY preliminary LUT to try address IR pollution on the Blackmagic cameras if not using a good ND/IR Cut like the new Hoya PROND's (see links below for Hoya comparisons to Tiffen IRNDs). I've found for Tiffen IRNDs on my Blackmagic footage, this LUT can help when used with a low output gain (as shown further above in some examples). Here the problem is shown extreme by using a 1.2ND Tiffen filter with NO IR Cut filter, and then after with my LUT set to 100% or "1" in the output gain. It's very important that this LUT is in the first node before ANY other corrections.
Blackmagic 4K - BM4KFilm 'VIBE' LUT - As Shot with NO IR Cut filter.

Blackmagic 4K - BM4KFilm 'VIBE' LUT + IR CUTTER LUT from the donators pack set to full/100%/"1". Not perfect, but a lot better starting place for grading than the before!! Obviously trying to solve this in post is far from ideal and is much better addressed by filtering, but i've found it useful all the same for certain footage i've shot, or supplied to me for grading.

Follow these links to see examples comparing the Hoya PRONDs to various Tiffen IRNDs:
Pocket Cam - http://www.bmcuser.com/showthread.php?6403-New-Hoya-ProNDs-Rolling-Report-Thread&p=97497&viewfull=1#post97497
4K Camera - http://www.bmcuser.com/showthread.php?6403-New-Hoya-ProNDs-Rolling-Report-Thread&p=108645&viewfull=1#post108645
Thanks again for the kind words and encouragement over the last (almost) year since releasing my first LUT, hope some of you find these ones just as useful!
**Any post by me prior to Aug 2014 was before i started working for Blackmagic**


