- Posts: 184
- Joined: Fri May 21, 2021 6:37 am
- Real Name: Sean Weaver
Advice On How To Accomplish Animating Scrolling Guitar tab?
Get answers to your questions about color grading, editing and finishing with DaVinci Resolve.
- Author
- Message
- Posts: 30189
- Joined: Fri Dec 23, 2016 1:47 am
![]() Sat Sep 04, 2021 3:48 pm
Sat Sep 04, 2021 3:48 pm
Bring in the Tab as a graphic, set up keyframes in a Transform node, use a Mask to limit the view.
My Biases:
You NEED training.
You NEED a desktop.
You NEED a calibrated (non-computer) display.
You NEED training.
You NEED a desktop.
You NEED a calibrated (non-computer) display.
- Posts: 184
- Joined: Fri May 21, 2021 6:37 am
- Real Name: Sean Weaver
![]() Sat Sep 04, 2021 7:30 pm
Sat Sep 04, 2021 7:30 pm
Jim Simon wrote:Bring in the Tab as a graphic, set up keyframes in a Transform node, use a Mask to limit the view.
Thanks. This helped, a ton.
Now the scroll moves left to right (in other words, bar 1 happens and trails off to the left border of the white window, now bar 2 is the left-most measure visible, etc. So that you're always reading the music left to right, as it would be laid out on a printed page).
Unfortunately I now see that doing it this way (per line of music) means that if you have 7 lines of music, with each line exported as a separate graphic, the scroll won't be continuous over the span of (say) 56 measures. To export 7 or 10 lines at a time as separate graphics and keyframe everything in time is probably prohibitive to cost/time/hopeful payoff, but if there are any musicians here who have worked with integrating Finale, Photoshop, and Davinci to do anything close to what I am trying to accomplish, I'd be forever grateful.
Otherwise I'm thinking my next best chance is to export an entire page at a time, have one line of music on-screen for a period of time per line of music (4-bars, the image is static/still), then when it goes to the next 4-bars (say measures 5-8), I keyframe it to slide up like a window shade, revealing the next line of music and so forth.
Competitors never do this I have noticed. They just put a pdf file below or use that Soundslide app which I don't even like. But I am trying to build something a little better than the rest....
- Attachments
-
- Node Tree.png (645.43 KiB) Viewed 5630 times
DR 18 Studio
macOS Monterey 12.7.2
MBP 16-Inch, 2019
2.4 GHz 8-Core Intel i9
32GB 2667 MHz DDR4
AMD Radeon Pro 5600M 8GB
macOS Monterey 12.7.2
MBP 16-Inch, 2019
2.4 GHz 8-Core Intel i9
32GB 2667 MHz DDR4
AMD Radeon Pro 5600M 8GB

- Posts: 758
- Joined: Sun Feb 07, 2021 9:48 pm
- Location: Vancouver, Canada
- Real Name: Sean Nelson
![]() Sun Sep 05, 2021 11:14 pm
Sun Sep 05, 2021 11:14 pm
Sean Weaver wrote:...Unfortunately I now see that doing it this way (per line of music) means that if you have 7 lines of music, with each line exported as a separate graphic, the scroll won't be continuous over the span of (say) 56 measures.
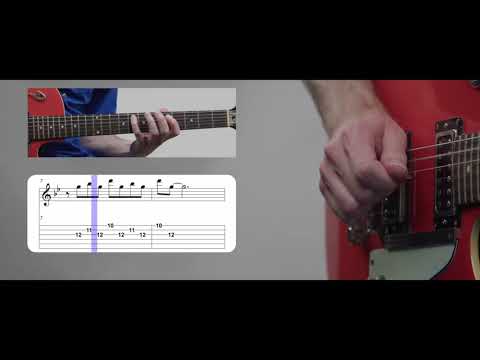
The way I'd design this is similar to what you described - have the music stationary with a highlight (perhaps a semi-transparent yellow bar) moving left-to right to indicate the tempo and notes being played. Then when you reach the end of the line, I'd scroll the line up out of the window at the same time as scrolling the next line up into the window. I suspect this would be easier to animate and it seems to me like it would better mimic the actual experience of reading printed music off a page. It also eliminates the issue of having the time signature constantly scrolling horizontally out of view.
If you have the room, I'd actually show two lines of music so that the next line is visible during the scroll between lines. That allows you to scroll slowly during time that the second line is being played and avoid distraction.
DR Studio 18.6.4 Build 6, Win10Pro x64 22H2/19045.3570
Asus C246 Pro Motherboard, Xeon E-2278G@3.4GHz, 64GB ECC RAM
GeForce 3060 12GB, "Studio" driver 512.15
OS,Library: 1TB NVMe SSD - Project,Cache: 1TB NVMe SSD
Asus C246 Pro Motherboard, Xeon E-2278G@3.4GHz, 64GB ECC RAM
GeForce 3060 12GB, "Studio" driver 512.15
OS,Library: 1TB NVMe SSD - Project,Cache: 1TB NVMe SSD
- Posts: 184
- Joined: Fri May 21, 2021 6:37 am
- Real Name: Sean Weaver
![]() Mon Sep 06, 2021 1:04 am
Mon Sep 06, 2021 1:04 am
Sean Nelson wrote:Sean Weaver wrote:...Unfortunately I now see that doing it this way (per line of music) means that if you have 7 lines of music, with each line exported as a separate graphic, the scroll won't be continuous over the span of (say) 56 measures.
The way I'd design this is similar to what you described - have the music stationary with a highlight (perhaps a semi-transparent yellow bar) moving left-to right to indicate the tempo and notes being played. Then when you reach the end of the line, I'd scroll the line up out of the window at the same time as scrolling the next line up into the window. I suspect this would be easier to animate and it seems to me like it would better mimic the actual experience of reading printed music off a page. It also eliminates the issue of having the time signature constantly scrolling horizontally out of view.
If you have the room, I'd actually show two lines of music so that the next line is visible during the scroll between lines. That allows you to scroll slowly during time that the second line is being played and avoid distraction.
Fantastic idea. I'm learning really fast but don't yet have years of experience behind me. Do you have any suggestions for which tools you'd explore in order to generate a highlight moving in time with the tempo? I was thinking just today and almost hopped on here to ask if anyone had advice on what I need to learn/explore in order to keyframe to a specific tempo/beat per minute marking. I'll look in the books and was wondering if the spline editor may come in handy for that specific question.
As for the highlight, I'll have a look at the Fusion tools again now. Obviously if you receive this reply and have specific suggestions or just general enough ones to say "read/learn/study about this in the manual -- if you can do that then you should be able to animate that," I'll love you forever
Sean
DR 18 Studio
macOS Monterey 12.7.2
MBP 16-Inch, 2019
2.4 GHz 8-Core Intel i9
32GB 2667 MHz DDR4
AMD Radeon Pro 5600M 8GB
macOS Monterey 12.7.2
MBP 16-Inch, 2019
2.4 GHz 8-Core Intel i9
32GB 2667 MHz DDR4
AMD Radeon Pro 5600M 8GB
- Posts: 758
- Joined: Sun Feb 07, 2021 9:48 pm
- Location: Vancouver, Canada
- Real Name: Sean Nelson
![]() Mon Sep 06, 2021 6:12 am
Mon Sep 06, 2021 6:12 am
Sean Weaver wrote:I was thinking just today and almost hopped on here to ask if anyone had advice on what I need to learn/explore in order to keyframe to a specific tempo/beat per minute marking. I'll look in the books and was wondering if the spline editor may come in handy for that specific question.
If it was me I'd try something like a yellow rectangle (use a "background" node to generate a yellow frame and then use a shape mask feeding into a matte control node to shape it to a narrow vertical rectangle) and then merge it onto your music, with a transform node before the merge to move it horizontally. You can adjust the "blend" property on the "settings" tab of the Inspector Page for the merge node to control how transparent the yellow line is.
Timing shouldn't be too big an issue, note the frame numbers of the first and last beats for the line, then add keyframes to the transform node to position the line to the first and last notes of the music at the first and last frame numbers respectively (this assumes that the notes are spaced proportionally with the beats, i.e., twice as much distance between quarter notes as between eighth notes, etc.).
Something like this:
- Attachments
-
- Music.jpg (20.19 KiB) Viewed 5497 times
DR Studio 18.6.4 Build 6, Win10Pro x64 22H2/19045.3570
Asus C246 Pro Motherboard, Xeon E-2278G@3.4GHz, 64GB ECC RAM
GeForce 3060 12GB, "Studio" driver 512.15
OS,Library: 1TB NVMe SSD - Project,Cache: 1TB NVMe SSD
Asus C246 Pro Motherboard, Xeon E-2278G@3.4GHz, 64GB ECC RAM
GeForce 3060 12GB, "Studio" driver 512.15
OS,Library: 1TB NVMe SSD - Project,Cache: 1TB NVMe SSD

![]() Mon Sep 06, 2021 3:15 pm
Mon Sep 06, 2021 3:15 pm
But if your music is a fairly stock shape and size, you should be able to scan it in, or frame grab it, how ever you get the graphic into the computer in the first place, and use it as a template.
Once you build it once in Fusion, lining up your 4 pages of sheet music end to end, cropping at the head bars, you should be able replicate that setup by swapping out your sources for other pieces of music. Just make your music pages the same size and layout each time. Even if you had to use a transform node at some point in the tree to do an adjustment for a sheet that isn't lining up perfectly. I would think this would be a pretty easy setup, and pretty easy to modify for different sheets of music.
Sure it might take an hour to setup your template, but modifying it for different music should be pretty quick.
It would be much easier for a student to look at the same spot on the screen to see the music at a glance, than to have to scan back and forth to find their place.
- Posts: 184
- Joined: Fri May 21, 2021 6:37 am
- Real Name: Sean Weaver
![]() Mon Sep 06, 2021 7:32 pm
Mon Sep 06, 2021 7:32 pm
Sean Nelson wrote:Sean Weaver wrote:I was thinking just today and almost hopped on here to ask if anyone had advice on what I need to learn/explore in order to keyframe to a specific tempo/beat per minute marking. I'll look in the books and was wondering if the spline editor may come in handy for that specific question.
Something like this:
Thank you very much Sean. I sincerely appreciate that. It makes sense to me, and the attachment helped a lot too. Still working out other details to get consistent, clean graphics (Finale notation, which doesn't really export with transparency, so I have to import to Photoshop and create transparency there; export again and fly into Davinci -- been on Finale for 25 years. Photoshop and Davinci for less than 1. Syncing everything together while not really fully understanding resolution has been a snag but I'm figuring it out) .
If I wind up with another Fusion snag/challenge, I'll update this thread.
I do have a problem/dilemma/issue with smooth playback (shooting 6k .braw on a pair of cameras) in Fusion. Tried "optimized media" and cache settings but no luck yet. Single tracks play back fine. It's slower (but manageable) when I stack tracks in the Edit page. In Fusion it becomes unusable with the 6k footage, particularly inserting both clips into a merge node for picture-in-picture. I have noticed if I create a Fusion clip at the timeline resolution (1920x1080 HD), so that I'm not compositing in 6k, of course it helps.
I bought a new computer specifically for video at the top of 2021.
2.4 GHz 8-Core Intel Core i9
32 GB 2667 MHz DDR4
AMD Radeon Pro 5600M 8 GB
Intel UHD Graphics 630 1536 MB
I just need things to play back smoothly enough in order to keyframe to downbeats!
DR 18 Studio
macOS Monterey 12.7.2
MBP 16-Inch, 2019
2.4 GHz 8-Core Intel i9
32GB 2667 MHz DDR4
AMD Radeon Pro 5600M 8GB
macOS Monterey 12.7.2
MBP 16-Inch, 2019
2.4 GHz 8-Core Intel i9
32GB 2667 MHz DDR4
AMD Radeon Pro 5600M 8GB
- Posts: 184
- Joined: Fri May 21, 2021 6:37 am
- Real Name: Sean Weaver
![]() Mon Sep 06, 2021 7:40 pm
Mon Sep 06, 2021 7:40 pm
Glenn Sakatch wrote:But if your music is a fairly stock shape and size, you should be able to scan it in, or frame grab it, how ever you get the graphic into the computer in the first place, and use it as a template.
Once you build it once in Fusion, lining up your 4 pages of sheet music end to end, cropping at the head bars, you should be able replicate that setup by swapping out your sources for other pieces of music. Just make your music pages the same size and layout each time. Even if you had to use a transform node at some point in the tree to do an adjustment for a sheet that isn't lining up perfectly. I would think this would be a pretty easy setup, and pretty easy to modify for different sheets of music.
Sure it might take an hour to setup your template, but modifying it for different music should be pretty quick.
It would be much easier for a student to look at the same spot on the screen to see the music at a glance, than to have to scan back and forth to find their place.
Thanks Glenn. It's probably me for staying up until 4am last night trying to map out/learn in order to pull this project off. I'm not sure I entirely understand. You're suggesting a way of generating a continuous scroll if I haven't misunderstood, correct?
I generate notation & TAB using Finale on Mac. Then export a graphic but have to create transparency in Photoshop. Then into Davinci. Obviously everything leaves Finale in a stock shape & size.
If I'm following what you're suggesting, then each page of music would only have one "system" (that is, line) of music on it....am I following? With 4-bars per line, you're suggesting 4 pages with a crop to the leftmost/head barline of each page...aligned end to end.....am I following?
DR 18 Studio
macOS Monterey 12.7.2
MBP 16-Inch, 2019
2.4 GHz 8-Core Intel i9
32GB 2667 MHz DDR4
AMD Radeon Pro 5600M 8GB
macOS Monterey 12.7.2
MBP 16-Inch, 2019
2.4 GHz 8-Core Intel i9
32GB 2667 MHz DDR4
AMD Radeon Pro 5600M 8GB
- Posts: 184
- Joined: Fri May 21, 2021 6:37 am
- Real Name: Sean Weaver
![]() Tue Sep 07, 2021 2:59 am
Tue Sep 07, 2021 2:59 am
Sean Nelson wrote:
Timing shouldn't be too big an issue, note the frame numbers of the first and last beats for the line, then add keyframes to the transform node to position the line to the first and last notes of the music at the first and last frame numbers respectively (this assumes that the notes are spaced proportionally with the beats, i.e., twice as much distance between quarter notes as between eighth notes, etc.).
Something like this:
Many thanks again. Next issue/dilemma.
I am "rehearsing" this animation and now running into trouble getting the highlighter Transform node key framing synchronized with the music wipe (as one line raises out and the next line raises in from below). Turns out that to get the music looking good on-screen, I'm having to export individual pages from Finale & Photoshop. I copied the nodes (and order) but replaced the graphic that goes along with "Music In" from one file to the next.
The picture I'm attaching shows my very humble, primitive attempt utilizing your suggested node sequence. I'm starting with a Picture In Picture composite (PiP), adding a white rectangle to make a backdrop for the TAB to sit on, and then setting up the sequence as you suggested with one addition -- I added another rectangle in order to form an invisible border past which the music/graphic becomes invisible. Otherwise I didn't know how to contain the notes/TAB within the white box (it would just slide up and over the guitar or other parts of the screen; I needed an invisible border)...When I did the copy/paste and tried to go for the next line of music is where I got lost with the best way to really set this up. Is there a better way or am I on track? And if so, maybe I just need to read a ton more about key framing and the spline editor.....
Can't thank you enough
Sean
- Attachments
-
- fusion nodes.png (122.79 KiB) Viewed 5401 times
DR 18 Studio
macOS Monterey 12.7.2
MBP 16-Inch, 2019
2.4 GHz 8-Core Intel i9
32GB 2667 MHz DDR4
AMD Radeon Pro 5600M 8GB
macOS Monterey 12.7.2
MBP 16-Inch, 2019
2.4 GHz 8-Core Intel i9
32GB 2667 MHz DDR4
AMD Radeon Pro 5600M 8GB
- Posts: 184
- Joined: Fri May 21, 2021 6:37 am
- Real Name: Sean Weaver
![]() Tue Sep 07, 2021 7:37 am
Tue Sep 07, 2021 7:37 am
Mods. Please do whatever you need to do if I should have edited my previous reply instead of posting twice in a row. Not trying to be an opportunist bouncing this back to the top, just very late here and as things change by the hour, my questions change.
The big news of the night is I can generate a graphic with all of the lines of music on it now. So the suggested node order that Sean Nelson was kind enough to show me will work without the copy/paste rigamarole I bothered you with in the previous post. However, I now have a new issue that if I can't resolve, I don't know how I'll pull this off...
When the music slides up out of the frame, I'm wondering how to keep the highlight linked to the line of music that is sliding up and out. The music slides up....the highlight slides up with it.
I guess that would require a new highlight starting with the new/next line of music. But maybe I'm looking at/thinking about this totally wrong, and maybe I just need to use the one highlight already created, and learn more about key-framing. Whatever the solution is, right now my problem is that when the music slides up, if the highlight doesn't move with it, then the highlight starts overlapping the notes/TAB for the period of time that the line below is sliding up & into place.
The "invisible border" I have into Merge2 is a crop in order keep the rest of the notation graphic out of the white "music viewer."
I put the Transform node on the Music_In node in order to keyframe up and out, as the line below slides into place.
I'm looking at this node tree thinking that in order for the highlight to be "locked" to the notes/TAB as it slides up and out, would the HighTransform (highlighter transform) and Music_Transform somehow have to be working together? Somehow wouldn't I need the music branch of the tree and the highlight branch of the tree linked together?
I really can't thank this forum enough for the ongoing help these past few days. There's probably an easy answer but right now my brain is fried on account of every night being a late-nighter. Hope this finds you all well and healthy.
Sean
Sean
- Attachments
-
- late question.png (49.19 KiB) Viewed 5366 times
DR 18 Studio
macOS Monterey 12.7.2
MBP 16-Inch, 2019
2.4 GHz 8-Core Intel i9
32GB 2667 MHz DDR4
AMD Radeon Pro 5600M 8GB
macOS Monterey 12.7.2
MBP 16-Inch, 2019
2.4 GHz 8-Core Intel i9
32GB 2667 MHz DDR4
AMD Radeon Pro 5600M 8GB

![]() Tue Sep 07, 2021 9:16 am
Tue Sep 07, 2021 9:16 am
Don't worry about multiple successive posts, no-one minds.
Could you upload a couple of sample TAB images, both in their original form as exported from Finale and after your modifications in Photoshop to make them transparent. If they're too big to attach here (very likely), put them on Google Drive or Dropbox or a similar service and link to them. If you can't post links yet, just put the link in a Code block and/or put a space at the start like: ht tps://google.com/xyz
I'd like to see what your source material is, then I'll see if I can knock something up that's straightforward to use.
Resolve Studio 17.4.3 and Fusion Studio 17.4.3 on macOS 11.6.1
Hackintosh:: X299, Intel i9-10980XE, 128GB DDR4, AMD 6900XT 16GB
Monitors: 1 x 3840x2160 & 3 x 1920x1200
Disk: 2TB NVMe + 4TB RAID0 NVMe; NAS: 36TB RAID6
BMD Speed Editor
Hackintosh:: X299, Intel i9-10980XE, 128GB DDR4, AMD 6900XT 16GB
Monitors: 1 x 3840x2160 & 3 x 1920x1200
Disk: 2TB NVMe + 4TB RAID0 NVMe; NAS: 36TB RAID6
BMD Speed Editor
- Posts: 184
- Joined: Fri May 21, 2021 6:37 am
- Real Name: Sean Weaver
![]() Tue Sep 07, 2021 7:06 pm
Tue Sep 07, 2021 7:06 pm
TheBloke wrote:Don't worry about multiple successive posts, no-one minds.
Could you upload a couple of sample TAB images, both in their original form as exported from Finale and after your modifications in Photoshop to make them transparent. If they're too big to attach here (very likely), put them on Google Drive or Dropbox or a similar service and link to them. If you can't post links yet, just put the link in a Code block and/or put a space at the start like: ht tps://google.com/xyz
I'd like to see what your source material is, then I'll see if I can knock something up that's straightforward to use.
Yes, and thank you, I will do that this afternoon. With Photoshop, I may well be screwing things up with resolution/size. I'm utterly confused on what resolution to use coming from the .PNG export out of Finale at the regular page size (or any custom page size I designate). I think I figured that part out at last but get confused when then dealing with importing & integrating with Davinci for video resolution. Consistently everything has to be resized at some point once I've flown the Photoshop export into Davinci.
I'll try to keep any video required to clarify the questions under a minute so it doesn't take too much of anyone's time to watch.
This thread will be updated with a link within a couple hours or sooner
Sean
DR 18 Studio
macOS Monterey 12.7.2
MBP 16-Inch, 2019
2.4 GHz 8-Core Intel i9
32GB 2667 MHz DDR4
AMD Radeon Pro 5600M 8GB
macOS Monterey 12.7.2
MBP 16-Inch, 2019
2.4 GHz 8-Core Intel i9
32GB 2667 MHz DDR4
AMD Radeon Pro 5600M 8GB
- Posts: 184
- Joined: Fri May 21, 2021 6:37 am
- Real Name: Sean Weaver
![]() Tue Sep 07, 2021 8:23 pm
Tue Sep 07, 2021 8:23 pm
TheBloke wrote:Don't worry about multiple successive posts, no-one minds.
Could you upload a couple of sample TAB images, both in their original form as exported from Finale and after your modifications in Photoshop to make them transparent. If they're too big to attach here (very likely), put them on Google Drive or Dropbox or a similar service and link to them. If you can't post links yet, just put the link in a Code block and/or put a space at the start like: ht tps://google.com/xyz
I'd like to see what your source material is, then I'll see if I can knock something up that's straightforward to use.
Here is a pair of .png source files. FinaleSample.png is obviously straight out of Finale. OutOfPhotoshop.png speaks for itself too of course.
I hope this video is short enough (5 minutes) and relevant enough that it does not waste anyone's time. I edited out 90-120 seconds of "um" and "waiting for this to take place" and anything that I thought was extraneous to showing where I am at currently while providing enough detail to communicate my questions clearly. (not sure if I can post links yet --- still very new to this forum, but just in case I can't, I put the space you suggested at the start)
ht tps://www.youtube.com/watch?v=BXjkYvoZj30
Many thanks again.
Sean
- Attachments
-
- Out Of Photoshop.png (86.25 KiB) Viewed 5305 times
-
- This Is A File Exported Directly Out Of Finale
- Finale Sample.png (621.13 KiB) Viewed 5305 times
DR 18 Studio
macOS Monterey 12.7.2
MBP 16-Inch, 2019
2.4 GHz 8-Core Intel i9
32GB 2667 MHz DDR4
AMD Radeon Pro 5600M 8GB
macOS Monterey 12.7.2
MBP 16-Inch, 2019
2.4 GHz 8-Core Intel i9
32GB 2667 MHz DDR4
AMD Radeon Pro 5600M 8GB
![]() Tue Sep 07, 2021 8:39 pm
Tue Sep 07, 2021 8:39 pm
OK I had a look. I'll be going to bed shortly, but I will look into a Fusion comp example for you tomorrow.
Quick thing in the meantime: you can forget about that whole Photoshop step. Firstly because it's likely not going to be necessary to have the notes on a transparent background. Secondly because even if that does prove to be useful in the comp, we can do it in a single node in Fusion.
Copy the code below and paste it into Fusion to recreate these nodes. Then go into the Loader node (top left) and click Browse and point it to your Finale Sample.png (it won't work immediately as the path I used on my disk won't be right for yours of course).
Then look at the output of Merge1. Same notes, different background.
I used a Luma Keyer (keys based on the luminance/brightness of pixels) to select all the black notes and then inverted it to mask out all the white. Super easy given your notes are just black on white. Then I merged that over a coloured background, just to show it working.
As I say we may well not need transparency anyway as the video example you showed earlier in the thread indicated you wanted the notes scrolling on white anyway. But if transparency does prove useful, you definitely don't need to bother with a manual Photoshop step to achieve it.
Demo comp showing how we can layer your black-on-white notes over any background using a Luma Keyer:
- Code: Select all
{
   Tools = ordered() {
      Merge1 = Merge {
         CtrlWZoom = false,
         Inputs = {
            Background = Input {
               SourceOp = "Background1",
               Source = "Output",
            },
            Foreground = Input {
               SourceOp = "LumaKeyer1",
               Source = "Output",
            },
            PerformDepthMerge = Input { Value = 0, },
         },
         ViewInfo = OperatorInfo { Pos = { 1336, 154.909 } },
      },
      LumaKeyer1 = LumaKeyer {
         Inputs = {
            Low = Input { Value = 0.45, },
            Filter = Input { Value = FuID { "Fast Gaussian" }, },
            MatteGamma = Input { Value = 3, },
            Invert = Input { Value = 1, },
            Input = Input {
               SourceOp = "Loader1",
               Source = "Output",
            },
         },
         ViewInfo = OperatorInfo { Pos = { 1336, 77.0606 } },
      },
      Background1 = Background {
         Inputs = {
            Width = Input { Value = 3840, },
            Height = Input { Value = 4320, },
            ["Gamut.SLogVersion"] = Input { Value = FuID { "SLog2" }, },
            TopLeftRed = Input { Value = 0.339, },
            TopLeftGreen = Input { Value = 1, },
            TopLeftBlue = Input { Value = 1, },
         },
         ViewInfo = OperatorInfo { Pos = { 1225.33, 154.909 } },
      },
      Loader1 = Loader {
         Clips = {
            Clip {
               ID = "Clip1",
               Filename = "/Users/tomj/Pictures/Downloaded/Finale Sample.png",
               FormatID = "PNGFormat",
               StartFrame = -1,
               LengthSetManually = true,
               TrimIn = 0,
               TrimOut = 0,
               ExtendFirst = 0,
               ExtendLast = 0,
               Loop = 0,
               AspectMode = 0,
               Depth = 0,
               TimeCode = 0,
               GlobalStart = 0,
               GlobalEnd = 0
            }
         },
         ViewInfo = OperatorInfo { Pos = { 1226, 77.0606 } },
         UserControls = ordered() {
            MakeLocal = {
               INP_Default = 0,
               INPID_InputControl = "ButtonControl",
               BTNCS_Execute = "                  args = { tool = comp.ActiveTool, copyTree = true }\n                  path = comp:MapPath(\"Scripts:support/Loader_MakeLocal.lua\")\n                  comp:RunScript(path, args)\n               ",
               IC_ControlPage = 0,
               LINKID_DataType = "Number",
               LINKS_Name = "Make Local",
            }
         }
      }
   }
}
Resolve Studio 17.4.3 and Fusion Studio 17.4.3 on macOS 11.6.1
Hackintosh:: X299, Intel i9-10980XE, 128GB DDR4, AMD 6900XT 16GB
Monitors: 1 x 3840x2160 & 3 x 1920x1200
Disk: 2TB NVMe + 4TB RAID0 NVMe; NAS: 36TB RAID6
BMD Speed Editor
Hackintosh:: X299, Intel i9-10980XE, 128GB DDR4, AMD 6900XT 16GB
Monitors: 1 x 3840x2160 & 3 x 1920x1200
Disk: 2TB NVMe + 4TB RAID0 NVMe; NAS: 36TB RAID6
BMD Speed Editor
- Posts: 184
- Joined: Fri May 21, 2021 6:37 am
- Real Name: Sean Weaver
![]() Tue Sep 07, 2021 8:54 pm
Tue Sep 07, 2021 8:54 pm
TheBloke wrote:OK I had a look. I'll be going to bed shortly, but I will look into a Fusion comp example for you tomorrow.
Quick thing in the meantime: you can forget about that whole Photoshop step. Firstly because it's likely not going to be necessary to have the notes on a transparent background. Secondly because even if that does prove to be useful in the comp, we can do it in a single node in Fusion.
Copy the code below and paste it into Fusion to recreate these nodes. Then go into the Loader node (top left) and click Browse and point it to your Finale Sample.png (it won't work immediately as the path I used on my disk won't be right for yours of course).
Then look at the output of Merge1. Same notes, different background.
I used a Luma Keyer (keys based on the luminance/brightness of pixels) to select all the black notes and then inverted it to mask out all the white. Super easy given your notes are just black on white. Then I merged that over a coloured background, just to show it working.
As I say we may well not need transparency anyway as the video example you showed earlier in the thread indicated you wanted the notes scrolling on white anyway. But if transparency does prove useful, you definitely don't need to bother with a manual Photoshop step to achieve it.
Demo comp showing how we can layer your black-on-white notes over any background using a Luma Keyer:I'll post again tomorrow when I've had a chance to fiddle in Fusion with the example comp for scrolling the notes with some kind of highlight.
- Code: Select all
{
   Tools = ordered() {
      Merge1 = Merge {
         CtrlWZoom = false,
         Inputs = {
            Background = Input {
               SourceOp = "Background1",
               Source = "Output",
            },
            Foreground = Input {
               SourceOp = "LumaKeyer1",
               Source = "Output",
            },
            PerformDepthMerge = Input { Value = 0, },
         },
         ViewInfo = OperatorInfo { Pos = { 1336, 154.909 } },
      },
      LumaKeyer1 = LumaKeyer {
         Inputs = {
            Low = Input { Value = 0.45, },
            Filter = Input { Value = FuID { "Fast Gaussian" }, },
            MatteGamma = Input { Value = 3, },
            Invert = Input { Value = 1, },
            Input = Input {
               SourceOp = "Loader1",
               Source = "Output",
            },
         },
         ViewInfo = OperatorInfo { Pos = { 1336, 77.0606 } },
      },
      Background1 = Background {
         Inputs = {
            Width = Input { Value = 3840, },
            Height = Input { Value = 4320, },
            ["Gamut.SLogVersion"] = Input { Value = FuID { "SLog2" }, },
            TopLeftRed = Input { Value = 0.339, },
            TopLeftGreen = Input { Value = 1, },
            TopLeftBlue = Input { Value = 1, },
         },
         ViewInfo = OperatorInfo { Pos = { 1225.33, 154.909 } },
      },
      Loader1 = Loader {
         Clips = {
            Clip {
               ID = "Clip1",
               Filename = "/Users/tomj/Pictures/Downloaded/Finale Sample.png",
               FormatID = "PNGFormat",
               StartFrame = -1,
               LengthSetManually = true,
               TrimIn = 0,
               TrimOut = 0,
               ExtendFirst = 0,
               ExtendLast = 0,
               Loop = 0,
               AspectMode = 0,
               Depth = 0,
               TimeCode = 0,
               GlobalStart = 0,
               GlobalEnd = 0
            }
         },
         ViewInfo = OperatorInfo { Pos = { 1226, 77.0606 } },
         UserControls = ordered() {
            MakeLocal = {
               INP_Default = 0,
               INPID_InputControl = "ButtonControl",
               BTNCS_Execute = "                  args = { tool = comp.ActiveTool, copyTree = true }\n                  path = comp:MapPath(\"Scripts:support/Loader_MakeLocal.lua\")\n                  comp:RunScript(path, args)\n               ",
               IC_ControlPage = 0,
               LINKID_DataType = "Number",
               LINKS_Name = "Make Local",
            }
         }
      }
   }
}
Fantastic. This alone is greatly useful just to keep learning in general (plus it will save me a lot of hassle/time even if transparency is needed). I really appreciate your time, expertise, and willingness to help me out on this one. I'll check back in tomorrow.
Sean
DR 18 Studio
macOS Monterey 12.7.2
MBP 16-Inch, 2019
2.4 GHz 8-Core Intel i9
32GB 2667 MHz DDR4
AMD Radeon Pro 5600M 8GB
macOS Monterey 12.7.2
MBP 16-Inch, 2019
2.4 GHz 8-Core Intel i9
32GB 2667 MHz DDR4
AMD Radeon Pro 5600M 8GB
- Posts: 184
- Joined: Fri May 21, 2021 6:37 am
- Real Name: Sean Weaver
![]() Wed Sep 08, 2021 6:02 am
Wed Sep 08, 2021 6:02 am
TheBloke wrote:
I used a Luma Keyer (keys based on the luminance/brightness of pixels) to select all the black notes and then inverted it to mask out all the white. Super easy given your notes are just black on white. Then I merged that over a coloured background, just to show it working.
A couple .jpeg files are attached to go along with this one follow-up after I have plugged the code in. I notice that what I had before coming out of Photoshop looks quite dark (very black notes) on the white background. This looks less bold to my eyes. Of course it still looks just fine and the size makes it large enough to easily read. But I am wondering if there is a way to darken the black note-heads using the keyer or another technique.
Obviously getting an animation plan together is much more important to my momentum forwards than laboring over the amount of "boldness" to the black ink. I easily realize this color difference is because the Photoshop routine involved adding black to the notes using the Paint Bucket tool, and the file coming out of Finale stock is what we are using now in this case.
I just appreciate your help so much that I want to clarify this is a very minor question that pales in comparison to getting an animation going, which is obviously my main goal. You're literally helping me see a 2 and a 1/2 year project through to completion by offering your help on this, so you're helping more than you may ever fully know. Launching this platform literally depends on what you've been generous enough with your time to help me with now
- Attachments
-
- 2.jpg (547.94 KiB) Viewed 5248 times
-
- 1.jpg (542.17 KiB) Viewed 5248 times
DR 18 Studio
macOS Monterey 12.7.2
MBP 16-Inch, 2019
2.4 GHz 8-Core Intel i9
32GB 2667 MHz DDR4
AMD Radeon Pro 5600M 8GB
macOS Monterey 12.7.2
MBP 16-Inch, 2019
2.4 GHz 8-Core Intel i9
32GB 2667 MHz DDR4
AMD Radeon Pro 5600M 8GB
![]() Wed Sep 08, 2021 9:13 pm
Wed Sep 08, 2021 9:13 pm
OK I've done an example comp, and a ten minute tutorial to go with it.
I uploaded the tutorial to YouTube but I uploaded it in 4K and it's not yet even processed the HD version, let alone the 4K one. If it's still not watchable at the time you see this, I also uploaded the tutorial vid to Google Drive so you can download and watch it locally: https://drive.google.com/file/d/1IL4FFk ... sp=sharing
Attached are:
1. A DRP project file you can import to get a Fusion Composition containing the simple comp I've set up, including a demonstration of a how it could be arranged on a Timeline.
2. The same comp exported as a .comp file which you can import into an existing project: in the Fusion page: File -> Import -> Fusion Composition.
As explained in the video, I've done a highlight but it doesn't look all that great. It's very basic. I tried a yellow overlay first but that looked even worse IMHO, so I went with colouring the numbers instead. It could definitely be improved from here.
The fundamental idea of scrolling the stave down and scrolling a highlight across is really simple, and will be achieved with keyframes on two nodes.
I wasn't quite sure what you wanted highlighted - whether it was just the TAB or the notes too, so I've just done the TAB. It's all a bit rudimentary but hopefully might point you in the right direction. If it doesn't look how you hoped let me know and I can look at it some more.
When loading the DRP and/or comp file, go into the Loader node and click Browse and re-point it to your local copy of Finale Sample.png. As mentioned in the video, you should use a Loader node to load this PNG, not a MediaIn as this can result in significantly lower performance.
I demonstrated some keyframing in the tutorial video, and those keyframes are still in place on the attached files. I would just delete them and start again, as I messed up the keyframing a bit while recording live. It was just there to show what control to animate.
YouTube video (still processing HD at the time of posting):

I uploaded the tutorial to YouTube but I uploaded it in 4K and it's not yet even processed the HD version, let alone the 4K one. If it's still not watchable at the time you see this, I also uploaded the tutorial vid to Google Drive so you can download and watch it locally: https://drive.google.com/file/d/1IL4FFk ... sp=sharing
Attached are:
1. A DRP project file you can import to get a Fusion Composition containing the simple comp I've set up, including a demonstration of a how it could be arranged on a Timeline.
2. The same comp exported as a .comp file which you can import into an existing project: in the Fusion page: File -> Import -> Fusion Composition.
As explained in the video, I've done a highlight but it doesn't look all that great. It's very basic. I tried a yellow overlay first but that looked even worse IMHO, so I went with colouring the numbers instead. It could definitely be improved from here.
The fundamental idea of scrolling the stave down and scrolling a highlight across is really simple, and will be achieved with keyframes on two nodes.
I wasn't quite sure what you wanted highlighted - whether it was just the TAB or the notes too, so I've just done the TAB. It's all a bit rudimentary but hopefully might point you in the right direction. If it doesn't look how you hoped let me know and I can look at it some more.
When loading the DRP and/or comp file, go into the Loader node and click Browse and re-point it to your local copy of Finale Sample.png. As mentioned in the video, you should use a Loader node to load this PNG, not a MediaIn as this can result in significantly lower performance.
I demonstrated some keyframing in the tutorial video, and those keyframes are still in place on the attached files. I would just delete them and start again, as I messed up the keyframing a bit while recording live. It was just there to show what control to animate.
 GuitarTab.drp.zip
- (192.33 KiB) Downloaded 61 times
- GuitarTab.comp.zip
- (5.6 KiB) Downloaded 71 times
YouTube video (still processing HD at the time of posting):
Resolve Studio 17.4.3 and Fusion Studio 17.4.3 on macOS 11.6.1
Hackintosh:: X299, Intel i9-10980XE, 128GB DDR4, AMD 6900XT 16GB
Monitors: 1 x 3840x2160 & 3 x 1920x1200
Disk: 2TB NVMe + 4TB RAID0 NVMe; NAS: 36TB RAID6
BMD Speed Editor
Hackintosh:: X299, Intel i9-10980XE, 128GB DDR4, AMD 6900XT 16GB
Monitors: 1 x 3840x2160 & 3 x 1920x1200
Disk: 2TB NVMe + 4TB RAID0 NVMe; NAS: 36TB RAID6
BMD Speed Editor
- Posts: 184
- Joined: Fri May 21, 2021 6:37 am
- Real Name: Sean Weaver
![]() Wed Sep 08, 2021 10:41 pm
Wed Sep 08, 2021 10:41 pm
TheBloke wrote:OK I've done an example comp, and a ten minute tutorial to go with it.
Thank you for this, you're my hero now. I will be downloading the file attachments in a short while and try this tonight. I have watched the full video already and this is on the right path. My only immediate questions are two short ones:
(A) I think just the TAB highlight is probably sufficient...most people use that instead of notation...but I harp on the value of people learning standard notation anyhow....how significant of a change with the LumaKeyer is it to add the noteheads/notation to the highlight? So that it the highlight would now be in stereo, with TAB and the notehead above both red.
(B) At the end of the video you had mentioned ways of improving the look and mentioned an arrow or even a rectangular box. I think with the TAB (and perhaps notes) turning red it's probably good enough, but adding an arrow or even just a box so thin that it looks like a narrow line might be the icing on the cake....how much more of a process would it be to add something like that in?
Once I start playing with this I'll probably have stronger feelings either way on whether any of those things are necessary, or even desirable. Right now it's just a basic question on how complex either of those things might be to embellish the look.
Thank you again so very much. I really appreciate your help and appreciate you taking the time to follow up. I will keep you posted!
Sean
DR 18 Studio
macOS Monterey 12.7.2
MBP 16-Inch, 2019
2.4 GHz 8-Core Intel i9
32GB 2667 MHz DDR4
AMD Radeon Pro 5600M 8GB
macOS Monterey 12.7.2
MBP 16-Inch, 2019
2.4 GHz 8-Core Intel i9
32GB 2667 MHz DDR4
AMD Radeon Pro 5600M 8GB

![]() Wed Sep 08, 2021 11:32 pm
Wed Sep 08, 2021 11:32 pm
Here's something I threw together just using the Edit page timeline. I used a graphic editor to replace your sheet music in your graphic with transparency. In resolve I used the transforms so one line fit into the window and keyframed them for scrolling. For the blue highlight bar I just used a text effect with the vertical bar character and lowered the opacity and keyframed it's horizontal position.
- Guitar-DR.jpg (388.39 KiB) Viewed 5169 times
Microsoft Windows 10 Pro x64
Intel(R) Core(TM) i7-6700, 3.40GHz, 32.0 GB
MB: MSI, BIOS: American Megatrends Inc. A.60, 12/17/2015
NVIDIA GeForce GTX 960, 2Gb
Resolve 18.1.1.0007(Free)
Intel(R) Core(TM) i7-6700, 3.40GHz, 32.0 GB
MB: MSI, BIOS: American Megatrends Inc. A.60, 12/17/2015
NVIDIA GeForce GTX 960, 2Gb
Resolve 18.1.1.0007(Free)
- Posts: 184
- Joined: Fri May 21, 2021 6:37 am
- Real Name: Sean Weaver
![]() Thu Sep 09, 2021 12:28 am
Thu Sep 09, 2021 12:28 am
Gary Hango wrote:I used a graphic editor to replace your sheet music in your graphic with transparency. In resolve I used the transforms so one line fit into the window and keyframed them for scrolling.
Thanks! This looks great too. Which graphic editor did you use to create the transparency? I'm assuming if I did the same thing in Photoshop the same technique would apply to do what you've done here? I'm a little unclear with how you got one line to fit into the window. How was the image cropped...how are the rest of the lines/title/....and blue bar...not overlapping other sections of the viewer? I understand where you're going with the text effect and key framing in the Edit page. Just a little hazy on the other stuff
DR 18 Studio
macOS Monterey 12.7.2
MBP 16-Inch, 2019
2.4 GHz 8-Core Intel i9
32GB 2667 MHz DDR4
AMD Radeon Pro 5600M 8GB
macOS Monterey 12.7.2
MBP 16-Inch, 2019
2.4 GHz 8-Core Intel i9
32GB 2667 MHz DDR4
AMD Radeon Pro 5600M 8GB
![]() Thu Sep 09, 2021 4:29 am
Thu Sep 09, 2021 4:29 am
I don't know where the grey background in your video came from. Was it part of the pick hand video or did you add it in your composite? If it's a separate element you added into your composite, you can use Photoshop to "cut out" the neck view window and the music line window. It appears the pick hand video is over laying the grey background. If the grey background is part of the pick hand video you will need to use mattes to "cut out" the windows. If you layer your videos correctly, you wont need to crop most of them, just zoom and move them so they appear correctly from behind the windows. The first video track would be the Finale music sheet. Next the text effect to create the highlight bar. Then your fingering video. This one you may need to crop so it doesn't show in the Finale window. Then the grey background with the transparent windows and finally the pick hand video. If you need to cut windows in the pick hand video, you'll need to play around with mattes using the routing on the Color page.
When you get the first line set up with all the keyframe timing of the highlight bar and music line roll for the first line of music, just copy that section of the Finale graphic track and the text effect track to the right and adjust transforms as required. Keep doing that until the music is finished.
When you get the first line set up with all the keyframe timing of the highlight bar and music line roll for the first line of music, just copy that section of the Finale graphic track and the text effect track to the right and adjust transforms as required. Keep doing that until the music is finished.
Microsoft Windows 10 Pro x64
Intel(R) Core(TM) i7-6700, 3.40GHz, 32.0 GB
MB: MSI, BIOS: American Megatrends Inc. A.60, 12/17/2015
NVIDIA GeForce GTX 960, 2Gb
Resolve 18.1.1.0007(Free)
Intel(R) Core(TM) i7-6700, 3.40GHz, 32.0 GB
MB: MSI, BIOS: American Megatrends Inc. A.60, 12/17/2015
NVIDIA GeForce GTX 960, 2Gb
Resolve 18.1.1.0007(Free)
- Posts: 184
- Joined: Fri May 21, 2021 6:37 am
- Real Name: Sean Weaver
![]() Thu Sep 09, 2021 5:29 am
Thu Sep 09, 2021 5:29 am
Gary Hango wrote:I don't know where the grey background in your video came from. Was it part of the pick hand video or did you add it in your composite?
Gary, thanks for your reply. The grey background is actually the raw footage. I'm shooting 60fps at a 45-degree angle shutter speed in a semi-finished basement, which required a TON of light as one would expect. The reason is because *everything* was going to have to be filmed (as in re-played) like 3-5 times in order to get regular tempo performances and super slowed down ones. The high fps and shutter angle was do play it once and be able to extract a bunch of clips/scenes/angles from one run-through/filming. By the time all of my light was on and the white backdrop behind me was nice and white (fretting hand window), the side view is, of course, underlit and underexposed on the vinyl backdrop "stage right" so that the viewer isn't seeing a concrete wall! 6-weeks ago I had the layout finished, or so I thought. Everything got masked in the color page with the HSL Qualifier and I had a top-bottom split screen with pure white everywhere else. In the end this was compressing the right hand strings into too narrow of a window and creating more problems than solving for an expedient setup. The left-hand shot has to be cropped in on the fingerboard since the raw footage is the entire front of the guitar (both hands)....specifically because I need a full frontal view too. In the end they're going to get views of the front of the hands (sometimes folks need to see something as simple as how pick motion comes from the wrist not elbow), pick attack/angle down the strings (the view in the stills I attached), and the picture-in-picture right & left hand composite with the music on-screen. Taking the right hand pick angle shot against the grey backdrop and cropping the front shot to create a fingerboard view enabled me to get everything I need out of two cameras and one performance (per example...there are like 50 examples to film though).
Of course I realize that animating something like 50 videos to go along with my book is going to be anything but quick but I can't thank you and everyone here enough. You're all helping me a lot, even when I get confused and don't perfectly understanding without a lot of re-reading, trial & error and follow-up questions, stumbling on my way to some semblance of progress
Sean
DR 18 Studio
macOS Monterey 12.7.2
MBP 16-Inch, 2019
2.4 GHz 8-Core Intel i9
32GB 2667 MHz DDR4
AMD Radeon Pro 5600M 8GB
macOS Monterey 12.7.2
MBP 16-Inch, 2019
2.4 GHz 8-Core Intel i9
32GB 2667 MHz DDR4
AMD Radeon Pro 5600M 8GB
- Posts: 184
- Joined: Fri May 21, 2021 6:37 am
- Real Name: Sean Weaver
![]() Thu Sep 09, 2021 7:31 am
Thu Sep 09, 2021 7:31 am
TheBloke wrote:I wasn't quite sure what you wanted highlighted - whether it was just the TAB or the notes too, so I've just done the TAB. It's all a bit rudimentary but hopefully might point you in the right direction. If it doesn't look how you hoped let me know and I can look at it some more.
Thanks again Tom. File my previous question under the category of "the question made me look stupid." I've actually been studying your video all evening and just had the Einstein moment (sometimes I'm slow to catch onto simple concepts) that in order to make the TAB and notes highlighted together, all I have to do is increase the vertical dimension of the RectHighlight node.
I am still wondering about what you mentioned about an arrow or adding something else to the visual. Gary's response (which came in later today) and the idea that he put together in the Edit page intrigued me too, and I'm now starting to wonder if perhaps the two approaches could be combined. I don't know if that might look too busy or wash out the highlight too much, but if so, then maybe a bar between the staves that scrolls left to right as the TAB numbers light up left to right. I tried seeing how I might fit something like that into the node tree you were kind enough to put together but it's very very late here now and my brain is mush and in need of some sleep. I could get a scrolling bar using a text node, but didn't have much success getting the key framing lined up "in stereo," so that everything was matched. It got me to scratching my head and wondering if there might be a way to set it up so that a bar or arrow or other kind of marker could still be controlled by key framing the same node that is controlling the lit up highlighted numbers.
Obviously I'm still new to all of this. I'd be completely lost without this forum. Literally couldn't do it. My appreciation for what you've already given of your time and help is very real. Thanks.
Sean
DR 18 Studio
macOS Monterey 12.7.2
MBP 16-Inch, 2019
2.4 GHz 8-Core Intel i9
32GB 2667 MHz DDR4
AMD Radeon Pro 5600M 8GB
macOS Monterey 12.7.2
MBP 16-Inch, 2019
2.4 GHz 8-Core Intel i9
32GB 2667 MHz DDR4
AMD Radeon Pro 5600M 8GB
![]() Thu Sep 09, 2021 11:25 am
Thu Sep 09, 2021 11:25 am
I've done another comp. The one I did yesterday was.. not good. Sorry about that. I'm a bit rusty with Fusion.
I've done another that looks better, combining both text highlight and coloured bar, and does it in about 1/3 as many nodes.


This is really simple. The music is transformed in a single node, setting its Size and Position - animate Center Y on TransformScrollMusic to move the music up and down.
RectHighlight, as before, is a rectangle defining the area to be highlighted. Animate its X position to move it left/right, and animate its Level to turn it off when scrolling the music, then back on again.
RectHighlight is a mask for a blue Background. This is merged over the music in Exclusion merge mode, which combines with the black notes and white background. Where we have black notes and TAB we get blue notes and TAB. Where we have white background, we get yellow background.
Change the colour of BGBoxHighlight to experiment with different highlight colours. The notes will always be the opposite colour to the coloured bar - eg blue/yellow, red/cyan, etc. You can use the Blend property of Merge5 to weaken the highlight if desired.
Setting BGBoxHighlight to red looks quite nice too:

Super simple but looks OK - at least for this kind of basic effect. And none of that Luma Keying nonsense.
Then we merge that over a transparent 1080p background and set the Corner Radius with a rectangle, as before. Job done.
This is still a simple and fairly boring effect, but it could be workable as a bare minimum sort of thing.
In terms of making better effects: could you upload the Finale source file? Not the PNG export, but the file you load/save in Finale? I would like to play around with Finale and see what its export options are. I'm thinking if we could have separate input PNGs - one with the stave with no notes, then another with just the notes, we could layer one over the other while also applying effects to the notes. Kind of like I was trying to do with the Luma Keyer, but much cleaner.
Here's the comp:
I've done another that looks better, combining both text highlight and coloured bar, and does it in about 1/3 as many nodes.
This is really simple. The music is transformed in a single node, setting its Size and Position - animate Center Y on TransformScrollMusic to move the music up and down.
RectHighlight, as before, is a rectangle defining the area to be highlighted. Animate its X position to move it left/right, and animate its Level to turn it off when scrolling the music, then back on again.
RectHighlight is a mask for a blue Background. This is merged over the music in Exclusion merge mode, which combines with the black notes and white background. Where we have black notes and TAB we get blue notes and TAB. Where we have white background, we get yellow background.
Change the colour of BGBoxHighlight to experiment with different highlight colours. The notes will always be the opposite colour to the coloured bar - eg blue/yellow, red/cyan, etc. You can use the Blend property of Merge5 to weaken the highlight if desired.
Setting BGBoxHighlight to red looks quite nice too:
Super simple but looks OK - at least for this kind of basic effect. And none of that Luma Keying nonsense.
Then we merge that over a transparent 1080p background and set the Corner Radius with a rectangle, as before. Job done.
This is still a simple and fairly boring effect, but it could be workable as a bare minimum sort of thing.
In terms of making better effects: could you upload the Finale source file? Not the PNG export, but the file you load/save in Finale? I would like to play around with Finale and see what its export options are. I'm thinking if we could have separate input PNGs - one with the stave with no notes, then another with just the notes, we could layer one over the other while also applying effects to the notes. Kind of like I was trying to do with the Luma Keyer, but much cleaner.
Here's the comp:
- GuitarTabv2.comp.zip
- (4.04 KiB) Downloaded 58 times
Resolve Studio 17.4.3 and Fusion Studio 17.4.3 on macOS 11.6.1
Hackintosh:: X299, Intel i9-10980XE, 128GB DDR4, AMD 6900XT 16GB
Monitors: 1 x 3840x2160 & 3 x 1920x1200
Disk: 2TB NVMe + 4TB RAID0 NVMe; NAS: 36TB RAID6
BMD Speed Editor
Hackintosh:: X299, Intel i9-10980XE, 128GB DDR4, AMD 6900XT 16GB
Monitors: 1 x 3840x2160 & 3 x 1920x1200
Disk: 2TB NVMe + 4TB RAID0 NVMe; NAS: 36TB RAID6
BMD Speed Editor
- Posts: 184
- Joined: Fri May 21, 2021 6:37 am
- Real Name: Sean Weaver
![]() Thu Sep 09, 2021 8:58 pm
Thu Sep 09, 2021 8:58 pm
TheBloke wrote:In terms of making better effects: could you upload the Finale source file? Not the PNG export, but the file you load/save in Finale? I would like to play around with Finale and see what its export options are. I'm thinking if we could have separate input PNGs - one with the stave with no notes, then another with just the notes, we could layer one over the other while also applying effects to the notes. Kind of like I was trying to do with the Luma Keyer, but much cleaner.
Thank you again for your help and for including the file! I've already loaded it and yes, this is fantastic. I didn't think yesterday's was anything to criticize, but I do like this new one a lot more.
The forum will not allow me to upload .MUSX files (which are Finale source files) and so to get around that I have it on my Dropbox at this link: https://www.dropbox.com/s/wfngr8j5fwzei ... .musx?dl=0
The attached .PNG files are to show what I spent an hour trying to do myself in the program....
(All of these are just samples. Not the literal files for videos I will be producing but generic source files...as I've been writing and transcribing in Finale for literally over 20 years).
I was hoping I could generate *just* the notes and *just* the staves independently by manipulating various menus in the software (that I'm fairly advanced with - Davinci, not so much).
I got close but think the deal-breaker is the music spacing when time signatures and clefs get hidden. I tried really hard (with a lot of searches like "how to lock Finale measure widths") and every time I hid a time signature or clef (worse, the combination), the barlines shifted in position so that now you'd have a blank music staff (no notes) with one spacing, and *just* the black notes and TAB numbers with a different spacing - which would of course wreak havoc on the whole reconstruction.
In the end I got 90% there, but because there would still be time signatures and clefs on both graphics in order to preserve consistent spacing between the two images, I'm guessing the last 10% prohibits the whole thing. In this case I am thinking it has to be all or nothing but maybe you have a few tricks up your sleeve.
Again, can't thank you enough for all of your help. If we can't move beyond what you've already generated, as far as we've come should certainly be plenty for me to get going with stockpiling videos together. But if more/better effects become a possibility, here are the files.
Sean
- Attachments
-
- Finale Sample No Lines.png (723.99 KiB) Viewed 4972 times
-
- Finale Sample BMD Forum No Notes.png (612.86 KiB) Viewed 4972 times
DR 18 Studio
macOS Monterey 12.7.2
MBP 16-Inch, 2019
2.4 GHz 8-Core Intel i9
32GB 2667 MHz DDR4
AMD Radeon Pro 5600M 8GB
macOS Monterey 12.7.2
MBP 16-Inch, 2019
2.4 GHz 8-Core Intel i9
32GB 2667 MHz DDR4
AMD Radeon Pro 5600M 8GB
![]() Fri Sep 10, 2021 11:53 am
Fri Sep 10, 2021 11:53 am
OK cool, that's exactly what I was thinking. No problem having the treble clef on both, it can be masked.
What do you think of this as a concept? It's a little more complicated to keyframe, but looks a bit more interesting. And there's probably more that could be done from here.
I've only done the first two notes for now.

What do you think of this as a concept? It's a little more complicated to keyframe, but looks a bit more interesting. And there's probably more that could be done from here.
I've only done the first two notes for now.
Resolve Studio 17.4.3 and Fusion Studio 17.4.3 on macOS 11.6.1
Hackintosh:: X299, Intel i9-10980XE, 128GB DDR4, AMD 6900XT 16GB
Monitors: 1 x 3840x2160 & 3 x 1920x1200
Disk: 2TB NVMe + 4TB RAID0 NVMe; NAS: 36TB RAID6
BMD Speed Editor
Hackintosh:: X299, Intel i9-10980XE, 128GB DDR4, AMD 6900XT 16GB
Monitors: 1 x 3840x2160 & 3 x 1920x1200
Disk: 2TB NVMe + 4TB RAID0 NVMe; NAS: 36TB RAID6
BMD Speed Editor
- Posts: 184
- Joined: Fri May 21, 2021 6:37 am
- Real Name: Sean Weaver
![]() Fri Sep 10, 2021 7:31 pm
Fri Sep 10, 2021 7:31 pm
TheBloke wrote: What do you think of this as a concept? It's a little more complicated to keyframe, but looks a bit more interesting. And there's probably more that could be done from here.
Thanks again Tom. Glad to hear the clef and time signature is no big deal to mask out and that this opens up creative possibilities.
It does look more interesting. I actually like what we had yesterday more though. That is not to suggest that I'm not interested in exploring other possibilities with clean background and foreground exports layered.
In this case, my concern is two-fold. While separating the notes as they highlight does call more attention to each individual note, it also separates the beams, which I think could be distracting in terms of rhythmic clarity. With the stack of solos I played (some were really hard!) containing everything from basic 8th notes to quintuplets, 32nds into 16ths and so forth, preserving a clean beam is probably of more importance in this specific case. The second consideration is that because the highlight pulls slightly away in this animation (the notehead moves slightly up; the TAB number moves slightly down), my concern is what happens with chordal notation, where I have 4 or 5 notes stacked vertically on-top of one another. And without seeing this approach on a chord yet, my concern is if this shift would cause all kinds of collisions between the notes when you have, say, 4-notes stacked on top of one another in a chordal passage.
Having said that, I'd love to hear as many ideas as you have and I'm sure that knowing this opens possibilities, my mind will run away with imagination in-between, so if I think of something that might be possible with this approach, I will update to ask how it can be done! Definitely let me know any additional ideas you have too and as always, I sincerely appreciate it. I was pretty surprised (in a good way) that anyone would help me as much as this and I realize that it's a complicated world where giving anyone else their time is a huge gift. So none of this was expected; just very graciously received.
This is definitely moving in a good direction, whether it's as simple as yesterday's approach or another avenue that opens up, now that we know I can generate clean exports of background/foreground out of Finale.
Sean
DR 18 Studio
macOS Monterey 12.7.2
MBP 16-Inch, 2019
2.4 GHz 8-Core Intel i9
32GB 2667 MHz DDR4
AMD Radeon Pro 5600M 8GB
macOS Monterey 12.7.2
MBP 16-Inch, 2019
2.4 GHz 8-Core Intel i9
32GB 2667 MHz DDR4
AMD Radeon Pro 5600M 8GB
![]() Sat Sep 11, 2021 7:45 am
Sat Sep 11, 2021 7:45 am
I played around with it a bit more but fundamentally I'm not an artist, so I think if you're happy with the simple one, go for that for now.
If you want more ideas you could post in the Fusion subforum, or the We Suck Less forum, both of which have a lot of Fusion professionals. I'm sure they'll have a bunch of good ideas for how to do it in a more interesting way.
If you want more ideas you could post in the Fusion subforum, or the We Suck Less forum, both of which have a lot of Fusion professionals. I'm sure they'll have a bunch of good ideas for how to do it in a more interesting way.
Resolve Studio 17.4.3 and Fusion Studio 17.4.3 on macOS 11.6.1
Hackintosh:: X299, Intel i9-10980XE, 128GB DDR4, AMD 6900XT 16GB
Monitors: 1 x 3840x2160 & 3 x 1920x1200
Disk: 2TB NVMe + 4TB RAID0 NVMe; NAS: 36TB RAID6
BMD Speed Editor
Hackintosh:: X299, Intel i9-10980XE, 128GB DDR4, AMD 6900XT 16GB
Monitors: 1 x 3840x2160 & 3 x 1920x1200
Disk: 2TB NVMe + 4TB RAID0 NVMe; NAS: 36TB RAID6
BMD Speed Editor
![]() Sat Sep 11, 2021 7:30 pm
Sat Sep 11, 2021 7:30 pm
Sean Weaver wrote:Glenn Sakatch wrote:But if your music is a fairly stock shape and size, you should be able to scan it in, or frame grab it, how ever you get the graphic into the computer in the first place, and use it as a template.
Once you build it once in Fusion, lining up your 4 pages of sheet music end to end, cropping at the head bars, you should be able replicate that setup by swapping out your sources for other pieces of music. Just make your music pages the same size and layout each time. Even if you had to use a transform node at some point in the tree to do an adjustment for a sheet that isn't lining up perfectly. I would think this would be a pretty easy setup, and pretty easy to modify for different sheets of music.
Sure it might take an hour to setup your template, but modifying it for different music should be pretty quick.
It would be much easier for a student to look at the same spot on the screen to see the music at a glance, than to have to scan back and forth to find their place.
Thanks Glenn. It's probably me for staying up until 4am last night trying to map out/learn in order to pull this project off. I'm not sure I entirely understand. You're suggesting a way of generating a continuous scroll if I haven't misunderstood, correct?
I generate notation & TAB using Finale on Mac. Then export a graphic but have to create transparency in Photoshop. Then into Davinci. Obviously everything leaves Finale in a stock shape & size.
If I'm following what you're suggesting, then each page of music would only have one "system" (that is, line) of music on it....am I following? With 4-bars per line, you're suggesting 4 pages with a crop to the leftmost/head barline of each page...aligned end to end.....am I following?
Yes, build your music sheets, bring them into fusion, crop them with a polygon tool, and merge them together, one after the other, so they go off screen to the right. Use the merge tool to line up the "next" one...the one going into the green triangle, to the "first" one ...the one going into the orange triangle. Once the first two are lined up, and a third one, and put it after the merge tool you just worked on. Dragging the new one's output square onto the pervious merge tools output square will create a new merge...again, line it up. Do this for all your sheets. You will probably have to manouver around a bit to continually look at the connection section in your viewer, but it is possible to do.
When all your merges are done, add a transform tool to the end after your last merge. Merge that transform onto your playing footage. You should now be able use that transform to to slide your long string of music pages back to the start...set a keyframe, go to the end of your music, slide your transform to the end of the footage, and set a keyframe. Remember fusion will allow you to slide a shot that is waaaaaaay longer than 1920 by 1080 over top of a 1920 x1080 shot.
Post a couple of your pages, and i'll see if i can whip up a sample.
- Posts: 184
- Joined: Fri May 21, 2021 6:37 am
- Real Name: Sean Weaver
![]() Sat Sep 11, 2021 7:36 pm
Sat Sep 11, 2021 7:36 pm
TheBloke wrote:I played around with it a bit more but fundamentally I'm not an artist, so I think if you're happy with the simple one, go for that for now.
Thanks Tom. You really have helped me a ton. Great to get your suggestions on the other sub-forum and other forum, but at this point, what you've given me is more than enough for me to finally get some videos started. The 1997 VHS "Hot Licks" type instructional guitar videos (I know, forever ago) look hideous compared to the simple one you generated and in my "market research" of the online-world, the few that do have notes/TAB on-screen certainly don't have anything better than the animated highlight. It's fun to wonder and think about all of the dazzling possibilities but realistically speaking I'm probably now at the point of diminishing returns, from a business/timeline perspective at least. Or at least until I get the product launched, out into the world. I really appreciate you sharing what you know and making this easy on me with the composition file attachments. It has freed me up to move forward.
Sean
DR 18 Studio
macOS Monterey 12.7.2
MBP 16-Inch, 2019
2.4 GHz 8-Core Intel i9
32GB 2667 MHz DDR4
AMD Radeon Pro 5600M 8GB
macOS Monterey 12.7.2
MBP 16-Inch, 2019
2.4 GHz 8-Core Intel i9
32GB 2667 MHz DDR4
AMD Radeon Pro 5600M 8GB
- Posts: 184
- Joined: Fri May 21, 2021 6:37 am
- Real Name: Sean Weaver
![]() Sat Sep 11, 2021 9:54 pm
Sat Sep 11, 2021 9:54 pm
Glenn Sakatch wrote:Yes, build your music sheets, bring them into fusion, crop them with a polygon tool, and merge them together, one after the other, so they go off screen to the right. Use the merge tool to line up the "next" one...the one going into the green triangle, to the "first" one ...the one going into the orange triangle. Once the first two are lined up, and a third one, and put it after the merge tool you just worked on. Dragging the new one's output square onto the pervious merge tools output square will create a new merge...again, line it up. Do this for all your sheets. You will probably have to manouver around a bit to continually look at the connection section in your viewer, but it is possible to do.
When all your merges are done, add a transform tool to the end after your last merge. Merge that transform onto your playing footage. You should now be able use that transform to to slide your long string of music pages back to the start...set a keyframe, go to the end of your music, slide your transform to the end of the footage, and set a keyframe. Remember fusion will allow you to slide a shot that is waaaaaaay longer than 1920 by 1080 over top of a 1920 x1080 shot.
Post a couple of your pages, and i'll see if i can whip up a sample.
Thank you for your response back and for your help!! I really appreciate it!!
This makes sense but I've run into a snag actually doing it. Even though the Fusion composition is just the pure graphic (no video) -- the cache and render times are ridiculous given the resolution of the graphic coming out of Finale. To pull this off I have 2 measures per page, which I then arranged in Fusion to try this out. The .PNG export itself is 10200x9600 --- I tried using a Background node at 1920x1080 (page 68-69 of The Visual Effects Guide To Davinci Resolve 17) and cropped the footage, then resized, but the raw images were still the raw images and so the processing is really slow. When it comes times to keyframe this to a track (rather, about 50 individual videos with 50 individual tracks), I'm seeing the writing on the wall that this is going to be a train wreck for clean playback for key framing to downbeats. But I did keep trying....
Finally by the time I got done with it all, the scroll was a bit laggy/jittery (on the export itself) and I'm not sure I even like the end result now that I see it. It seems like it might mess with the way a player's eyes are used to scanning a page of music, reading from left to right. In other words, with the music scrolling, now the eyes are either in the wrong spot if they scan right, or to stay locked on the current note, the eyes have to look stationary, in place, consistently at the left-most side of the page.
It may well be the jitter that's killing it for me and/or shifting my perceptions. Perhaps if it was a smooth scroll I'd be looking at the eye-movement/natural reading mechanics differently. Hard to say without a clean scroll as-is.
I'm definitely leaning towards the stationary look now with each line keyframed up and out as the next line moves up into place, with a bar highlighting the notes.
Having said that, if there's something fundamental that I'm missing to a clean example of what the continuous scroll could be, I'd love to learn!!!
My sample:

A couple of actual Finale exports are on my Dropbox at: https://www.dropbox.com/sh/ly1az3cme0yl ... l8SYa?dl=0
DR 18 Studio
macOS Monterey 12.7.2
MBP 16-Inch, 2019
2.4 GHz 8-Core Intel i9
32GB 2667 MHz DDR4
AMD Radeon Pro 5600M 8GB
macOS Monterey 12.7.2
MBP 16-Inch, 2019
2.4 GHz 8-Core Intel i9
32GB 2667 MHz DDR4
AMD Radeon Pro 5600M 8GB
![]() Sat Sep 11, 2021 11:24 pm
Sat Sep 11, 2021 11:24 pm
Here is a quick attempt at this. I took the sheets into photoshop, and reduced them way down to fit into a 1920 by 1080 frame size. Patched 6 of them together, with two different rectangle crops, because it looks like you need to be able to crop tight to the start of the music to keep the timing straight, and both sheets had a different amount of information before the music starts.
I did a 26 second animation, overtop of a still of the original youtube posting, and had no problem with real time playback. I did 26 seconds, to allow 2 seconds at the head before the music hits the timing bar.
Strangly enough, the playback seems smoother in fusion, than it does on the rendered file. I'm doing a gradient extrapolation for the keyframes, so the speed would have to be played with a bit...depending on the spacing between the pages, and the real world count of the music.
give it a look, maybe it will inspire you or someone else with some better ideas.
Glenn
- Attachments
-
- guitar scroll.zip
- (848.79 KiB) Downloaded 67 times
- Posts: 184
- Joined: Fri May 21, 2021 6:37 am
- Real Name: Sean Weaver
![]() Sun Sep 12, 2021 5:51 am
Sun Sep 12, 2021 5:51 am
Glenn Sakatch wrote: Strangely enough, the playback seems smoother in fusion, than it does on the rendered file. I'm doing a gradient extrapolation for the keyframes, so the speed would have to be played with a bit...depending on the spacing between the pages, and the real world count of the music.
give it a look, maybe it will inspire you or someone else with some better ideas.
Glenn
Thanks Glenn. I did give it a look and I appreciate you putting this together! It took awhile for me to connect the dots but I think I have, or at least enough to understand how you put it together for now (I'm new enough to all of this that I have to study all the time still).
At first I had vetoed it on account of jitter in the rendered file. Then I remembered something in the BMD book on Visual Effects (pages 156-161) which I had begun working through and abandoned because I am completely out of time to get this project off of the ground and start filming....but I got far enough to have remembered the section on making credits roll without jitter.
Applying that to the music scroll, moving 2 or 3 pixels per frame on a consistent basis, I was able to use Relative Loop in the Spline Editor to get a nice smooth roll. Having said that, I suspect that while this may be great for movie credits, in my particular case of matching to a tempo, it may not be so simple once I film a performance and am working to a musical tempo.
At this point my best shot is to shoot the raw footage for a couple of these examples and transition from "practice" and advance planning to giving it a go and seeing what happens. If I can get a continuous scroll in time to the music without jitter, that would be pretty cool. If I can't, I also really like the animation Tom (The Bloke) came up with earlier in this thread.
Can't thank everyone enough for your abundance of help and generosity!
Sean
DR 18 Studio
macOS Monterey 12.7.2
MBP 16-Inch, 2019
2.4 GHz 8-Core Intel i9
32GB 2667 MHz DDR4
AMD Radeon Pro 5600M 8GB
macOS Monterey 12.7.2
MBP 16-Inch, 2019
2.4 GHz 8-Core Intel i9
32GB 2667 MHz DDR4
AMD Radeon Pro 5600M 8GB
![]() Sun Sep 12, 2021 3:52 pm
Sun Sep 12, 2021 3:52 pm
Ya, the problem with a smooth movie credit roll is it has to be as long as the proper pixels per frame x the length of your credits. When the producer asks for a 30 second credit roll, smoothness goes out the window. With the music, you obviously need a very specific speed...4 seconds per sections i guess, so then maybe the question becomes, how many sections, strung together, give you the proper timing at 3 or 4 pixels per frame. (haven't done a roll for a couple of years, but i think i settled on 3 pixels per frame for speed vs legibility.)
One of the reasons I always try to do credit pages instead of rolls")
One of the reasons I always try to do credit pages instead of rolls
- Posts: 184
- Joined: Fri May 21, 2021 6:37 am
- Real Name: Sean Weaver
![]() Sun Sep 12, 2021 9:36 pm
Sun Sep 12, 2021 9:36 pm
Glenn Sakatch wrote:Ya, the problem with a smooth movie credit roll is it has to be as long as the proper pixels per frame x the length of your credits. When the producer asks for a 30 second credit roll, smoothness goes out the window. With the music, you obviously need a very specific speed...4 seconds per sections i guess, so then maybe the question becomes, how many sections, strung together, give you the proper timing at 3 or 4 pixels per frame. (haven't done a roll for a couple of years, but i think i settled on 3 pixels per frame for speed vs legibility.)
One of the reasons I always try to do credit pages instead of rolls
This is all good information. If nothing else, this has helped enormously in understanding why no one else does this in the guitar world. All of my tempos were to the grid but different tempos for different tracks, obviously. At 120bpm, 4 seconds per page (two bars in 4/4 = 8 beats across two bars) makes sense. Seeing as that goes out the window (meaning it's an entirely new time frame) when you have a dotted quarter at 67bpm over a 12/8 groove, this is actually exactly what I wanted most of all out of all the pre-production and forum help. If I know ahead of time that something is going to take too long to churn out without days per video, then it helps me to plan accordingly. A couple hours or even a few per video (even at my remedial level of Davinci prowess < 30 years of guitar playing = easy; Fusion...somewhat daunting), no big deal.
Pixels per frame makes sense to me on a loose level, but I don't really know (at least off the top of my head; from the top student in high school calculus to 21 years down the line having done nothing but play guitar) to calculate sections of music to timing when spread out 3 pixels per frame, for example.
In order to really churn these out with any efficiency (seeing as there's like 45 or 50 to produce), the scroll may have to give way to the stationary but I do wish I understood the theory a little better.
DR 18 Studio
macOS Monterey 12.7.2
MBP 16-Inch, 2019
2.4 GHz 8-Core Intel i9
32GB 2667 MHz DDR4
AMD Radeon Pro 5600M 8GB
macOS Monterey 12.7.2
MBP 16-Inch, 2019
2.4 GHz 8-Core Intel i9
32GB 2667 MHz DDR4
AMD Radeon Pro 5600M 8GB
- Posts: 184
- Joined: Fri May 21, 2021 6:37 am
- Real Name: Sean Weaver
![]() Mon Sep 13, 2021 2:20 am
Mon Sep 13, 2021 2:20 am
Glenn Sakatch wrote:With the music, you obviously need a very specific speed...4 seconds per sections i guess, so then maybe the question becomes, how many sections, strung together, give you the proper timing at 3 or 4 pixels per frame.
Having written the previous note sort of surrendering to imperfection or simplification, my mind is continuing to run this over.
So at 120bpm with 2-bars taking up 4-seconds -- and the music exported in 2-bar sections (per graphic), at 3 pixels per frame at 24fps (hypothetically for calculation -- in the real cases I am shooting at 60fps, but discussing the theory at 24fps), I have 72 pixels per second. Thus, 288 pixels every four seconds.
At this point I am getting stumped. At 1920x1080, we have 1920 pixels in width as long as I'm not completely embarrassing myself here (all of this is new and simple things seem complex to my brain now overtaken by music at the expense of simple mathematical intuition...sometimes this makes me feel...not smart....I got out of high school with honors and proceeded to flood my brain with guitar playing as the rest trailed off to make more room for "Hot Licks").
With 288 pixels in 4-seconds, clearly at 1920 pixels in width it's nowhere near in tempo with the music now (and for practical validation I tried it very quickly to confirm how "off" it is). 1920/288 would be worth plugging into the calculator and wound up rounded up to 7 pixels per frame but then it was jittery again.
I'll keep running this over but if anyone can point me in the direction of a trustworthy article or fill in the gap of "what comes next" in how I should be calculating this for a 3 pixels per frame scroll, I'll be forever grateful.
Sean
DR 18 Studio
macOS Monterey 12.7.2
MBP 16-Inch, 2019
2.4 GHz 8-Core Intel i9
32GB 2667 MHz DDR4
AMD Radeon Pro 5600M 8GB
macOS Monterey 12.7.2
MBP 16-Inch, 2019
2.4 GHz 8-Core Intel i9
32GB 2667 MHz DDR4
AMD Radeon Pro 5600M 8GB
- Posts: 184
- Joined: Fri May 21, 2021 6:37 am
- Real Name: Sean Weaver
![]() Thu Sep 16, 2021 12:18 am
Thu Sep 16, 2021 12:18 am
Several Days Later Update:
Looks like I am making the continuous scroll work with a ton more time and research. I was able to change the page size within Finale to export a continuous line of music start to end; so no need to line up 5 or 6 individual graphics now. Then I was able to convert it to an 8000x1080 size in Photoshop, import to Davinci and streamline Glenn's approach with fewer nodes. In the process...
I am shooting at 60fps and the key framing is a ton smoother for that...the scroll is tolerable without too much shake. Having said that....
How can I determine the resolution of a window within a picture?
Merging the footage over the continuous scroll is taxing my already not really powerful enough to work at 60fps computer. Everything was supposed to be simple at the top of the year. When the plan became to shoot at 60fps with a 45 degree shutter angle, everything became more complicated from lighting, to, now, processing.
Ideally I would prefer to keyframe the music scroll as a separate composition and then overlay that onto the main footage, with it fitted to the white rectangle area below the left hand shot.
I'm still new enough to all of this that I don't know how to look at a rectangle box and determine what resolution that box itself is. It seems I should be able to crop Glenn's composition to the resolution of the box it will overlay, which would spare plugging my picture in picture footage (and node tree) into an already busy composition. At this point it's just trying to conserve any last shred of processing that I can unburden the system with.
I'll look into this more on my own but if anyone has a suggestion please let me know!!!
Thanks,
Sean
DR 18 Studio
macOS Monterey 12.7.2
MBP 16-Inch, 2019
2.4 GHz 8-Core Intel i9
32GB 2667 MHz DDR4
AMD Radeon Pro 5600M 8GB
macOS Monterey 12.7.2
MBP 16-Inch, 2019
2.4 GHz 8-Core Intel i9
32GB 2667 MHz DDR4
AMD Radeon Pro 5600M 8GB
![]() Fri Sep 17, 2021 7:04 pm
Fri Sep 17, 2021 7:04 pm
Sean, I think you're way over thinking this with all the pixel mathematics. You'll never finish this project by making it more complicated than it should be. You need to come up with a method that's the best balance between what you want artistically and what is easiest to implement.
Below is my take on the horizontal music scroll and highlight bar using just the edit page. It's just a matter of setting keyframes for both at the first beat of each measure. I just grabbed a random guitar player on youtube to show how the keyframes line up with the music. It's only 24fps so yours at 60fps will be much smoother.

Here's a link to my Resolve archive.
https://drive.google.com/file/d/1LFVWi6XgNf8CvraLe0_xdfR7Wa-nO224/view?usp=sharing
Below is my take on the horizontal music scroll and highlight bar using just the edit page. It's just a matter of setting keyframes for both at the first beat of each measure. I just grabbed a random guitar player on youtube to show how the keyframes line up with the music. It's only 24fps so yours at 60fps will be much smoother.
Here's a link to my Resolve archive.
https://drive.google.com/file/d/1LFVWi6XgNf8CvraLe0_xdfR7Wa-nO224/view?usp=sharing
Microsoft Windows 10 Pro x64
Intel(R) Core(TM) i7-6700, 3.40GHz, 32.0 GB
MB: MSI, BIOS: American Megatrends Inc. A.60, 12/17/2015
NVIDIA GeForce GTX 960, 2Gb
Resolve 18.1.1.0007(Free)
Intel(R) Core(TM) i7-6700, 3.40GHz, 32.0 GB
MB: MSI, BIOS: American Megatrends Inc. A.60, 12/17/2015
NVIDIA GeForce GTX 960, 2Gb
Resolve 18.1.1.0007(Free)
![]() Fri Sep 17, 2021 7:18 pm
Fri Sep 17, 2021 7:18 pm
Something else you might consider, hiring out the compositing, animation and editing to someone else, as you're filming your lessons. Film a lesson, hand off the footage and music graphics, film the next, etc. Is finishing in possibly less than half the time worth the extra cost? Can you recoup this cost by having the project generating cashflow sooner?
Something to think about.
Something to think about.
Microsoft Windows 10 Pro x64
Intel(R) Core(TM) i7-6700, 3.40GHz, 32.0 GB
MB: MSI, BIOS: American Megatrends Inc. A.60, 12/17/2015
NVIDIA GeForce GTX 960, 2Gb
Resolve 18.1.1.0007(Free)
Intel(R) Core(TM) i7-6700, 3.40GHz, 32.0 GB
MB: MSI, BIOS: American Megatrends Inc. A.60, 12/17/2015
NVIDIA GeForce GTX 960, 2Gb
Resolve 18.1.1.0007(Free)
- Posts: 184
- Joined: Fri May 21, 2021 6:37 am
- Real Name: Sean Weaver
![]() Fri Sep 17, 2021 10:30 pm
Fri Sep 17, 2021 10:30 pm
Gary Hango wrote:Something else you might consider, hiring out the compositing, animation and editing to someone else, as you're filming your lessons. Film a lesson, hand off the footage and music graphics, film the next, etc. Is finishing in possibly less than half the time worth the extra cost? Can you recoup this cost by having the project generating cashflow sooner?
Something to think about.
Thanks Gary. And thank you for the above!
Fair point. I have considered it. (I looked for subforms here but have not yet found a section to locate editors, animators, etc. available for hire). More so 6 months ago.
In the end, I'm realistically too far into it to stop now (began writing in 2017 or so; started buying gear, RAID storage, conversations with data people on archival security, and working through stacks of videography (getting a bunch more lighting and setting up the set) toward the top of '21, and started spending all day and night sessions on Davinci tutorials around last Spring...but it worked, as I get something turned around within a day now....before the animation slow-down but now I've completed the first one at last).
I'd be perfectly happy to launch sooner and recoup the cost but seeing as I'm so close now (got footage shot for two more solos today) the course is fairly set. It was always a long term game plan. Mostly because this isn't a burst to dump a bunch of content and step back. The manuscript alone is like 12-14 volumes (1500 pages). The audio-visual experience for the book is just the start. I synthesized 30 years of guitar playing into a system to give me content for the rest of life. Once the train is rolling I can slow down, or delegate and take time off. Right now it's tunnel vision.
Thanks for including the archive. I very much so appreciate it!! It wouldn't grant me access though, so I sent a request from my Google email
DR 18 Studio
macOS Monterey 12.7.2
MBP 16-Inch, 2019
2.4 GHz 8-Core Intel i9
32GB 2667 MHz DDR4
AMD Radeon Pro 5600M 8GB
macOS Monterey 12.7.2
MBP 16-Inch, 2019
2.4 GHz 8-Core Intel i9
32GB 2667 MHz DDR4
AMD Radeon Pro 5600M 8GB
![]() Fri Sep 17, 2021 11:17 pm
Fri Sep 17, 2021 11:17 pm
Sorry for the private Google Drive link. I updated it to allow anyone with the link.
Microsoft Windows 10 Pro x64
Intel(R) Core(TM) i7-6700, 3.40GHz, 32.0 GB
MB: MSI, BIOS: American Megatrends Inc. A.60, 12/17/2015
NVIDIA GeForce GTX 960, 2Gb
Resolve 18.1.1.0007(Free)
Intel(R) Core(TM) i7-6700, 3.40GHz, 32.0 GB
MB: MSI, BIOS: American Megatrends Inc. A.60, 12/17/2015
NVIDIA GeForce GTX 960, 2Gb
Resolve 18.1.1.0007(Free)
- Posts: 184
- Joined: Fri May 21, 2021 6:37 am
- Real Name: Sean Weaver
![]() Fri Sep 17, 2021 11:20 pm
Fri Sep 17, 2021 11:20 pm
Gary Hango wrote:Sorry for the private Google Drive link. I updated it to allow anyone with the link.
I appreciate it Gary. My sincere thanks.
DR 18 Studio
macOS Monterey 12.7.2
MBP 16-Inch, 2019
2.4 GHz 8-Core Intel i9
32GB 2667 MHz DDR4
AMD Radeon Pro 5600M 8GB
macOS Monterey 12.7.2
MBP 16-Inch, 2019
2.4 GHz 8-Core Intel i9
32GB 2667 MHz DDR4
AMD Radeon Pro 5600M 8GB

![]() Sat Sep 18, 2021 5:29 pm
Sat Sep 18, 2021 5:29 pm
Wow,
Never figured out how hard it is to display a guitar tab on a Youtube video! And I seen countless videos with tabs!
I wonder how everyone else does them!
Never figured out how hard it is to display a guitar tab on a Youtube video! And I seen countless videos with tabs!
I wonder how everyone else does them!
- Resolve 17.3.1
- Windows 10, Build 19043
- Processor Intel(R) Xeon(R) CPU X5675 @ 3.07GHz, 4393 Mhz, 6 Core(s), 12 Logical Processor(s)
- Installed Physical Memory (RAM) 16.0 GB
- Radeon RX 580 Series
- Posts: 184
- Joined: Fri May 21, 2021 6:37 am
- Real Name: Sean Weaver
![]() Sat Sep 18, 2021 7:18 pm
Sat Sep 18, 2021 7:18 pm
Jobol777 wrote:Wow,
Never figured out how hard it is to display a guitar tab on a Youtube video! And I seen countless videos with tabs!
I wonder how everyone else does them!
With notations on-screen or .pdf links below? I've been doing this for a lifetime going back to the really hideous on-screen graphics with the VHS instructional tapes (those Hot Licks and StarLicks videos) and have done transcription for hire work for both Homespun and Stefan Grossman's Guitar Workshop, but I very rarely see notations on screen on YouTube and/or, when I do (including the legacy companies probably now largely holding on in the Internet era; as the VHS and DVD era is obviously a thing of the past), it just doesn't look all that good to me. Ever. Hot Licks was one of the worst. Granted that was 25 years ago. "Total Electric Guitar," you have Eric Johnson with a Strat with a white pick guard and notation on screen....in white ink!!! What kind of sense did that make? Eric is pretty much a genius level player. I get it was over a quarter of a century ago, but the design was not helpful. I was a little kid fumbling through that stapled together book that came with the VHS trying to follow along through each example. The on-screen presentation with "Notes and TAB right on screen!" was a disaster.
In the end, the way to improve as a musician is to improve one's ears and figure things out off of records...while learning academically sound principles, how to read/write, and fundamental harmonic principles. But in launching a product dependent on an audience in this day and age, the cold hard truth gives way to presenting things in a more instantly gratifying fashion I suppose. I've been in deep cognitive dissonance for 15 years at what the Internet did to the consumer/musician relationship (and the quality of overall musicianship for those learning it; you have more players with better chops today than at any time in history perhaps.....and fewer than ever who know what to do with those chops outside of an IG post that took 34 takes to film, but I rant and shout at the sky in vain and had to let all of the negativity go) but it's the world we live in now so I'm only doing myself a disservice to look back on yesterday. In the situation and world I find myself in there is a task before me. I'd rather find a way to help in this climate than to fade away from it altogether. And so it's on me to put one foot in front of the other and be a grown up, seeking common ground and trying to leave more than I take, and help others along the way.
Sincerely, I'd love to see reference material if there are YouTube videos you can link to or DM me links to. I've been looking fairly far and wide and have thus far only seen some classical guitar lessons with scrolling TAB. Everything else I've seen is either stationary diagrams (like a chord chart), or illustrations, or fretboard scale diagrams. I just haven't seen much notation/TAB on-screen so if you have I would love to see what others are doing for it.
Literally, just seeing other videos I may not have yet seen can help me develop a better end-game since I think I'm invested in this for the long-haul now (3 years in development if going by the time I started writing the bulk of the book; 5 or 6 years if going from the time I first casually began writing).
Last edited by Sean Weaver on Sat Sep 18, 2021 7:33 pm, edited 1 time in total.
DR 18 Studio
macOS Monterey 12.7.2
MBP 16-Inch, 2019
2.4 GHz 8-Core Intel i9
32GB 2667 MHz DDR4
AMD Radeon Pro 5600M 8GB
macOS Monterey 12.7.2
MBP 16-Inch, 2019
2.4 GHz 8-Core Intel i9
32GB 2667 MHz DDR4
AMD Radeon Pro 5600M 8GB
![]() Sat Sep 18, 2021 7:30 pm
Sat Sep 18, 2021 7:30 pm
Sean Weaver wrote:With notations on-screen or .pdf links below?
Something like this:


I mean I never really thought about how hard it is. And also their timing with the animation is spot on!
- Resolve 17.3.1
- Windows 10, Build 19043
- Processor Intel(R) Xeon(R) CPU X5675 @ 3.07GHz, 4393 Mhz, 6 Core(s), 12 Logical Processor(s)
- Installed Physical Memory (RAM) 16.0 GB
- Radeon RX 580 Series
- Posts: 184
- Joined: Fri May 21, 2021 6:37 am
- Real Name: Sean Weaver
![]() Sat Sep 18, 2021 7:34 pm
Sat Sep 18, 2021 7:34 pm
Jobol777 wrote:Sean Weaver wrote:With notations on-screen or .pdf links below?
Something like this:
I mean I never really thought about how hard it is. And also their timing with the animation is spot on!
Awesome. Thank you tons!!
DR 18 Studio
macOS Monterey 12.7.2
MBP 16-Inch, 2019
2.4 GHz 8-Core Intel i9
32GB 2667 MHz DDR4
AMD Radeon Pro 5600M 8GB
macOS Monterey 12.7.2
MBP 16-Inch, 2019
2.4 GHz 8-Core Intel i9
32GB 2667 MHz DDR4
AMD Radeon Pro 5600M 8GB
47 posts
• Page 1 of 1
Who is online
Users browsing this forum: Google [Bot], Jmac3000 and 170 guests