When you matte out objects in that fashion, they should be recombined using an Add operation instead of a Merge. To demonstrate, here's a very simple setup (just copy the code and paste it into your node graph. The tools will appear):
- Code: Select all
{
   Tools = ordered() {
      Background1 = Background {
         Inputs = {
            GlobalIn = Input { Value = 1, },
            Width = Input { Value = 1920, },
            Height = Input { Value = 1080, },
            Depth = Input { Value = 3, },
            ["Gamut.SLogVersion"] = Input { Value = FuID { "SLog2" }, },
            TopLeftRed = Input { Value = 1, },
            TopLeftGreen = Input { Value = 1, },
            TopLeftBlue = Input { Value = 1, },
            EffectMask = Input {
               SourceOp = "Rectangle1",
               Source = "Mask",
            }
         },
         ViewInfo = OperatorInfo { Pos = { 605, 148.5 } },
      },
      Background1_1 = Background {
         Inputs = {
            ApplyMaskInverted = Input { Value = 1, },
            GlobalIn = Input { Value = 1, },
            Width = Input { Value = 1920, },
            Height = Input { Value = 1080, },
            Depth = Input { Value = 3, },
            ["Gamut.SLogVersion"] = Input { Value = FuID { "SLog2" }, },
            TopLeftRed = Input { Value = 1, },
            TopLeftGreen = Input { Value = 1, },
            TopLeftBlue = Input { Value = 1, },
            EffectMask = Input {
               SourceOp = "Rectangle1",
               Source = "Mask",
            }
         },
         ViewInfo = OperatorInfo { Pos = { 605, 214.5 } },
      },
      Rectangle1 = RectangleMask {
         Inputs = {
            Filter = Input { Value = FuID { "Box" }, },
            SoftEdge = Input { Value = 0.0641, },
            MaskWidth = Input { Value = 1920, },
            MaskHeight = Input { Value = 1080, },
            PixelAspect = Input { Value = { 1, 1 }, },
            ClippingMode = Input { Value = FuID { "None" }, },
            Center = Input { Value = { 0.18574297188755, 0.5 }, },
            Width = Input { Value = 0.616465863453815, },
            Height = Input { Value = 1.5, },
         },
         ViewInfo = OperatorInfo { Pos = { 495, 148.5 } },
      },
      ChannelBooleans1 = ChannelBoolean {
         CtrlWZoom = false,
         Inputs = {
            Operation = Input { Value = 1, },
            Background = Input {
               SourceOp = "Background1_1",
               Source = "Output",
            },
            Foreground = Input {
               SourceOp = "Background1",
               Source = "Output",
            },
         },
         ViewInfo = OperatorInfo { Pos = { 770, 280.5 } },
      },
      Merge1 = Merge {
         Inputs = {
            Background = Input {
               SourceOp = "Background1_1",
               Source = "Output",
            },
            Foreground = Input {
               SourceOp = "Background1",
               Source = "Output",
            },
            PerformDepthMerge = Input { Value = 0, },
         },
         ViewInfo = OperatorInfo { Pos = { 770, 214.5 } },
      }
   }
}
If you turn on the Waveform SubView, you can see the slope created by the blurred alpha:
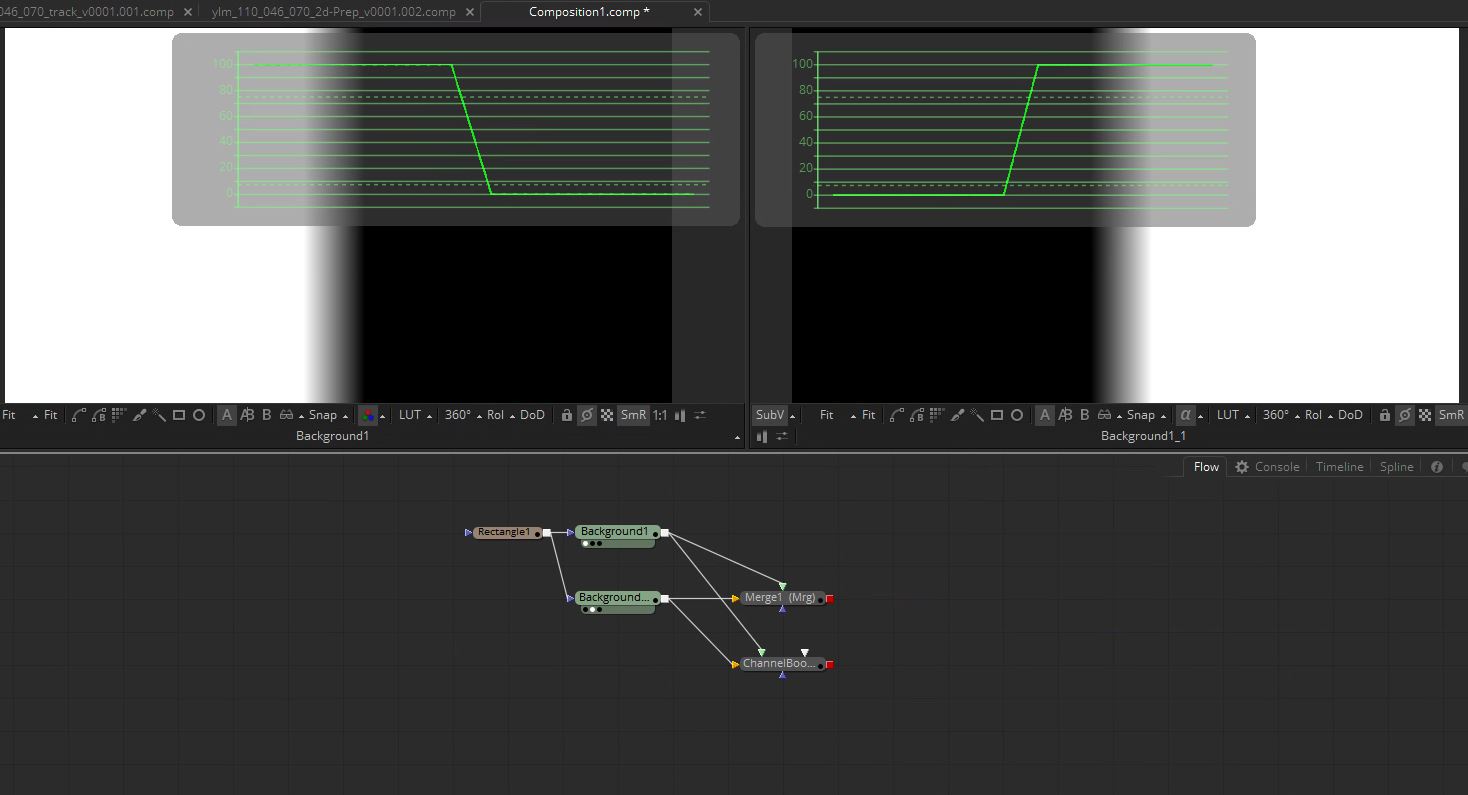
- Capture.JPG (93.59 KiB) Viewed 1097 times
Looking at the result of the Merge, you'll see the trough, just like with your example image:

- Capture2.JPG (25.46 KiB) Viewed 1097 times
This happens because during a Merge operation, the alpha of the Foreground is used to "punch a hole" in the Background, and then the two parts of the image are added together. In this case, you've done the hole punching yourself ahead of time, so the background is being darkened a second time during the Merge.
Knowing that you've already made the hole due to the way you've segmented the image, you can instead simply add the two parts together (see the ChannelBooleans tool) to get the result you expected, without the trough:

- Capture3.JPG (33.03 KiB) Viewed 1097 times
Notice that even though I'm adding two images together, the waveform shows that it never goes above 100% (1.0).

