- Posts: 9234
- Joined: Tue Sep 11, 2012 10:20 am
- Location: Poland
![]() Sat Apr 18, 2020 2:57 pm
Sat Apr 18, 2020 2:57 pm
In the name of the developer I'm writing about this new cool app which is free and works on PC, Mac and Linux:
http://mogurenko.com
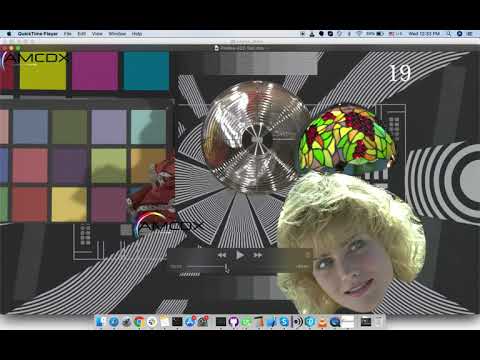
Some videos from the author (app been progressing nicely):

Note: treat it as a BETA version, so the best to copy every source file you are trying to process. You use it on your own risk!
It has been tested, but not crazy intensively and due to fact that many apps produces MOV files which are not necessarily according to spec you may end up with a corrupted file.
App has 3 main tabs: Frame Editor, Metadata Editor and File to File:
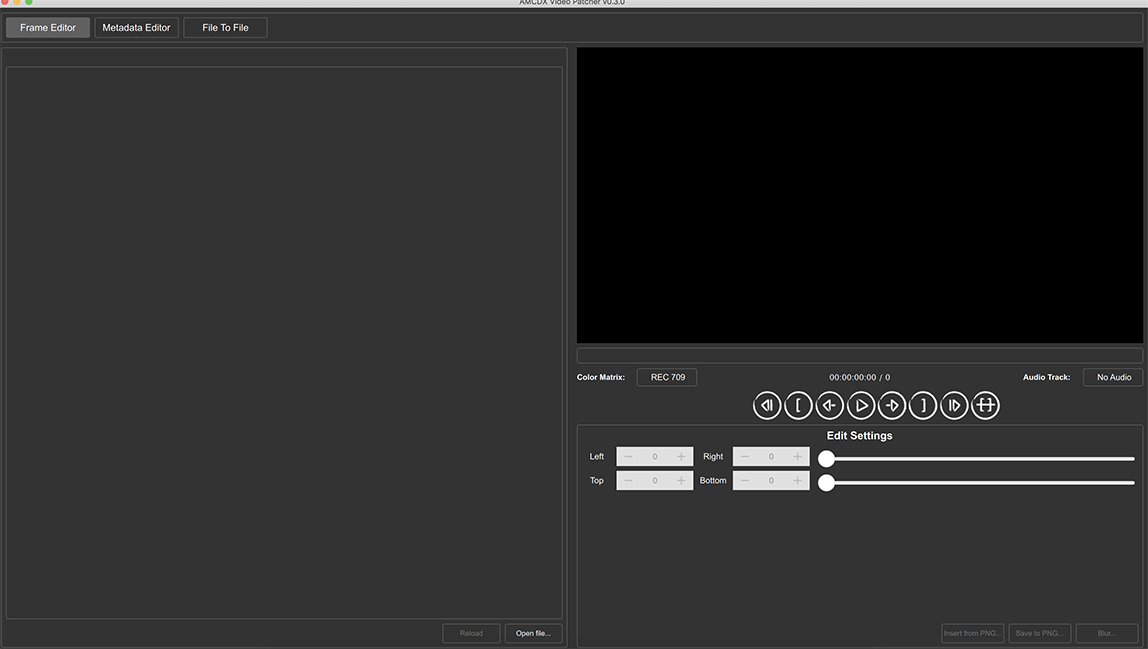
1. Frame Editor allows you to patch a single frame (or its part) or blur chosen area. It supports only ProRes files.
For example. You produced a master and found frame with some small dropout and want to fix it. Instead of using an editor, fixing it there and then exporting new file, you can do it way faster.
You browse to the problematic frame and export it as PNG (it's 16bit to save bit precision). You load it to some tool, eg. Photoshop and fix the problem. Export back to 16bit PNG. Then in tool you load fixed PNG and app will automatically replace it in your file (moment you load PNG, so be aware!). This happens in-place and it's basically instant. App uses custom ProRes encoder which is way better than ffmpeg one.
Other current possibility is blurring. You set IN/OUT, region with sliders and press blur. This will blur chosen area (between IN/OUT). If you press "Blur" again then it will blur more. Again- changes are instant and can't be undone. In this case only chosen area is re-encoded.
2. Metadata Editor allows you to patch ProRes private headers as well as MOV container headers. MOV headers can be adjusted for different codecs, not just ProRes (in this case Frame Metadata is greyed out):
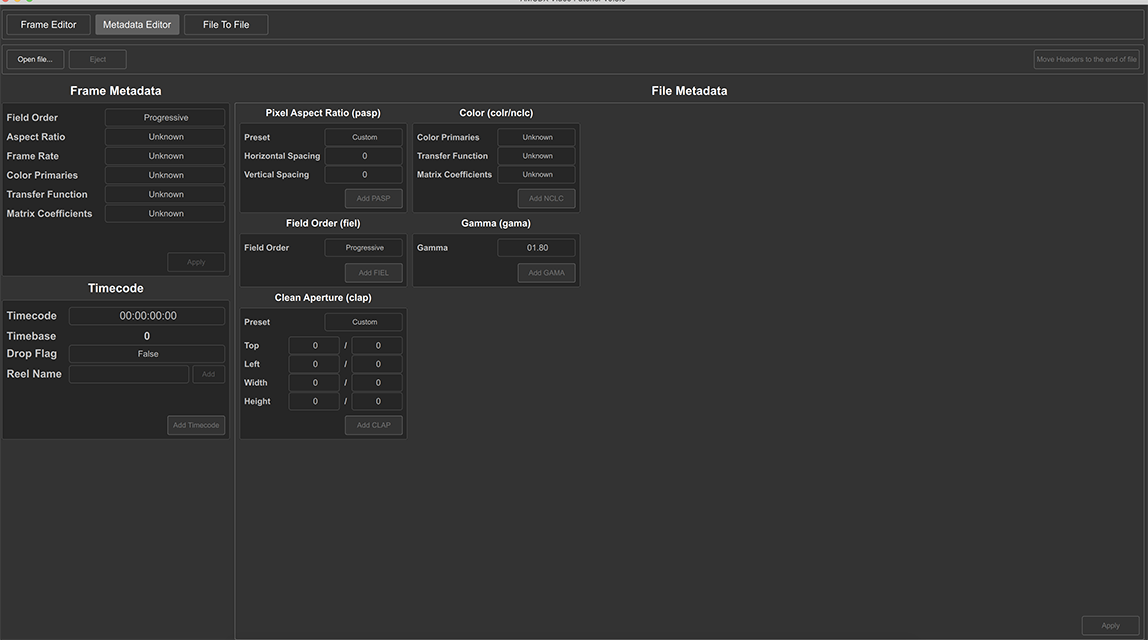
"Frame Metadata" allows to change ProRes private headers. Each ProRes frame stores own info about different parameters. You can adjust as you desire (most apps don't write aspect or frame rate info, so you can leave it as is) and Apply. App will go through whole file and replace info for each frame. It's quite fast even for big files (I tested 300GB files and it took about 3 min., file was on fast storage). If you press cancel before app finishes then some frames will be adjusted, but rest won't. It's not end of the world as most tools read container headers, so your file will still work fine. This option is just to produce "perfect" files (ProRes metadata should be aligned with MOV headers).
"Timecode" is self explanatory. You can adjust existing info, add/remove Reel Name. You can add timecode info if not present at all (atm. there is no remove TC track option). Timebase is just an info (it's close to fps although not exactly the same, eg. 23.976 and 24 will have timebase as 24). For "NTSC" based files you can set Drop Frame flag to True or False.
"Pixel Aspect Ratio" allows you to set desired values, which is very important for SD files. HD files are basically always 1x1, except some DVCProHD or HDV files when it's 4x3.
Provided presets are not so useful in my opinion. Best to use Custom and type own values:
PAL 16x9 (modern file with 720 active lines) = 64x45
PAL 4x3 (modern file with 720 active lines) = 16x15
NTSC 16x9 (modern file with 720 active lines) = 32x27
NTSC 4x3 (modern file with 720 active lines) = 8x9
For old "analog" spec files with clean aperture you need to use different value and also add Clean Aperture info. I will write about it later.
"Field Order"- for interlaced files you use (not so sure why, but this is correct flagging):
Top Field- Top stored First, Bottom displayed First
Bottom Field- Bottom stored First, Top displayed First
This is also very useful option when you have a progressive master, but you need to deliver to broadcast which requires interlaced flagging. In this case you can just re-flag file quickly as Top Field.
Note: we can't change between interlaced and progressive on ProRes private headers as it would corrupt decoding. In order to do it we would have to re-encode file. Fortunately it's typically not needed in order to make file acceptable by "broadcasters". MOV headers flagged as TFF/BFF should be enough.
"Color" - you can adjust exiting values (ideally ProRes private headers should match these settings), remove info or add if not existing in file. Typically Rec.709/Rec.709/Rec.709 is used for HD SDR, as well as BT.2020/PQ (or ARIB-STD-B67 for HLG)/BT.2020 for HDR files. Sometimes Color Primaries can be set to P3 D65 (if we exported from Resolve as P3 D65, not BT.2020). It's quite important not to mix those 2 and always check what client wants- P3 D65 or P3 D65 graded, but exported within Rec.2020.
"Gamma"- adds "old" gamma tag. This can be useful for tagging files with eg. Rec.709 gamut, but 2.4 gamma. In this case you set Transfer Function to "Unspecified" and add gamma as 2.4. This is exactly what current Resolve does for Rec.709 2.4 gamma files. It's understood by Resolve itself, OSX color engine (QT X, Safari etc) and Baselight.
"Move headers to the end of file"- if file is exported for streaming then all of this info is at the beginning of MOV file. In this case it's possible only to adjust values, but there is not much room to add info if it's not present (typically there is some space, but depending which tool exported file it can be very small). In such a case tabs will be greyed out and "Move headers to the end of file" will be active. In order to have possibility to add all needed info headers can be moved to the end of the file where we can add as much as we want (we just make file bigger). Of course this stops file to be streaming ready. Maybe later there will be an option to move headers back to the beginning (this require re-writing whole file though).
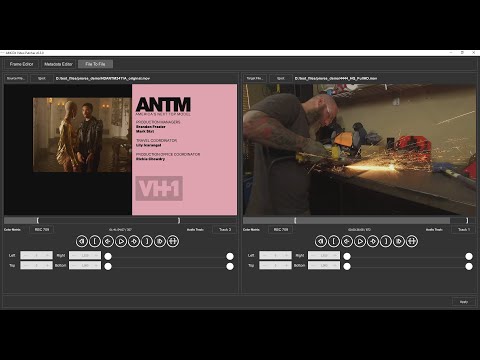
3. File to File it allows to insert section from one file to another ( ProRes only ):
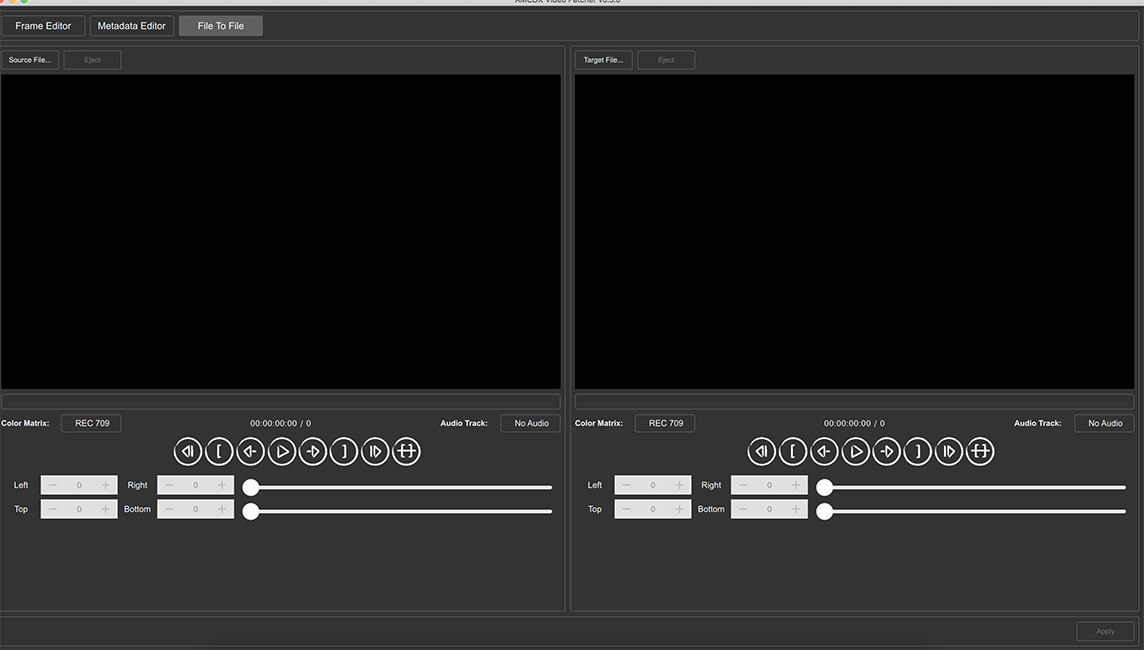
It's similar to Frame Editor, but you can replace long sections. You load source and target files. Set IN/OUT for both and hit Apply.
This will take IN/OUT section from source and insert to target file starting from specified IN point there. Target OUT point is more important than IN, so if you set 5seconds for source, but only 3 for target then only 3 seconds will be inserted. App will take each frame and insert to target replacing original frame. Due to VBR nature of ProRes frame will be encoded to exactly match size of the target frame. This means that you should not try to replace black frames (or fades) at target with "normal" video as you will get bad quality. For similar nature source/target footage it will all work absolutely fine. If you have (or not ) audio in your source file app will only replace video in the target.
Further notes from the author:
- there are not many sanity checks like fps or field order or chroma subsampling. In other words, it’s up to a user if he/she wants to replace 23.98 sequence with 29.97…
- Chroma subsampling: if Target and Source files have different chroma subsampling the source video will be decoded and chroma will be up/down sampled.
- Field Order: if Target and Source files have different field order the source video will be decoded and encoded back as it has the same field order (Note: If you insert interlaced video to progressive video will be encoded as progressive but without deinterlacing)
ProRes Frame Metadata, and Timecode tabs have own Apply buttons, where others have Apply button in the right, bottom corner (so you need to press it). You can then Eject file and open again to check if changes have been made. Because tool works mainly instantly when you press Apply it's basically done. It's bit strange at the begging as you are not sure if it's done or not") This may change to give user more feedback.
This may change to give user more feedback.
One more time- treat tool as a BETA and copy all source file before making adjustments.
There are many more features planned.
Please report bugs, desired features etc. The more feedback the faster app will become stable and even more useful.
http://mogurenko.com
Some videos from the author (app been progressing nicely):
Note: treat it as a BETA version, so the best to copy every source file you are trying to process. You use it on your own risk!
It has been tested, but not crazy intensively and due to fact that many apps produces MOV files which are not necessarily according to spec you may end up with a corrupted file.
App has 3 main tabs: Frame Editor, Metadata Editor and File to File:
1. Frame Editor allows you to patch a single frame (or its part) or blur chosen area. It supports only ProRes files.
For example. You produced a master and found frame with some small dropout and want to fix it. Instead of using an editor, fixing it there and then exporting new file, you can do it way faster.
You browse to the problematic frame and export it as PNG (it's 16bit to save bit precision). You load it to some tool, eg. Photoshop and fix the problem. Export back to 16bit PNG. Then in tool you load fixed PNG and app will automatically replace it in your file (moment you load PNG, so be aware!). This happens in-place and it's basically instant. App uses custom ProRes encoder which is way better than ffmpeg one.
Other current possibility is blurring. You set IN/OUT, region with sliders and press blur. This will blur chosen area (between IN/OUT). If you press "Blur" again then it will blur more. Again- changes are instant and can't be undone. In this case only chosen area is re-encoded.
2. Metadata Editor allows you to patch ProRes private headers as well as MOV container headers. MOV headers can be adjusted for different codecs, not just ProRes (in this case Frame Metadata is greyed out):
"Frame Metadata" allows to change ProRes private headers. Each ProRes frame stores own info about different parameters. You can adjust as you desire (most apps don't write aspect or frame rate info, so you can leave it as is) and Apply. App will go through whole file and replace info for each frame. It's quite fast even for big files (I tested 300GB files and it took about 3 min., file was on fast storage). If you press cancel before app finishes then some frames will be adjusted, but rest won't. It's not end of the world as most tools read container headers, so your file will still work fine. This option is just to produce "perfect" files (ProRes metadata should be aligned with MOV headers).
"Timecode" is self explanatory. You can adjust existing info, add/remove Reel Name. You can add timecode info if not present at all (atm. there is no remove TC track option). Timebase is just an info (it's close to fps although not exactly the same, eg. 23.976 and 24 will have timebase as 24). For "NTSC" based files you can set Drop Frame flag to True or False.
"Pixel Aspect Ratio" allows you to set desired values, which is very important for SD files. HD files are basically always 1x1, except some DVCProHD or HDV files when it's 4x3.
Provided presets are not so useful in my opinion. Best to use Custom and type own values:
PAL 16x9 (modern file with 720 active lines) = 64x45
PAL 4x3 (modern file with 720 active lines) = 16x15
NTSC 16x9 (modern file with 720 active lines) = 32x27
NTSC 4x3 (modern file with 720 active lines) = 8x9
For old "analog" spec files with clean aperture you need to use different value and also add Clean Aperture info. I will write about it later.
"Field Order"- for interlaced files you use (not so sure why, but this is correct flagging):
Top Field- Top stored First, Bottom displayed First
Bottom Field- Bottom stored First, Top displayed First
This is also very useful option when you have a progressive master, but you need to deliver to broadcast which requires interlaced flagging. In this case you can just re-flag file quickly as Top Field.
Note: we can't change between interlaced and progressive on ProRes private headers as it would corrupt decoding. In order to do it we would have to re-encode file. Fortunately it's typically not needed in order to make file acceptable by "broadcasters". MOV headers flagged as TFF/BFF should be enough.
"Color" - you can adjust exiting values (ideally ProRes private headers should match these settings), remove info or add if not existing in file. Typically Rec.709/Rec.709/Rec.709 is used for HD SDR, as well as BT.2020/PQ (or ARIB-STD-B67 for HLG)/BT.2020 for HDR files. Sometimes Color Primaries can be set to P3 D65 (if we exported from Resolve as P3 D65, not BT.2020). It's quite important not to mix those 2 and always check what client wants- P3 D65 or P3 D65 graded, but exported within Rec.2020.
"Gamma"- adds "old" gamma tag. This can be useful for tagging files with eg. Rec.709 gamut, but 2.4 gamma. In this case you set Transfer Function to "Unspecified" and add gamma as 2.4. This is exactly what current Resolve does for Rec.709 2.4 gamma files. It's understood by Resolve itself, OSX color engine (QT X, Safari etc) and Baselight.
"Move headers to the end of file"- if file is exported for streaming then all of this info is at the beginning of MOV file. In this case it's possible only to adjust values, but there is not much room to add info if it's not present (typically there is some space, but depending which tool exported file it can be very small). In such a case tabs will be greyed out and "Move headers to the end of file" will be active. In order to have possibility to add all needed info headers can be moved to the end of the file where we can add as much as we want (we just make file bigger). Of course this stops file to be streaming ready. Maybe later there will be an option to move headers back to the beginning (this require re-writing whole file though).
3. File to File it allows to insert section from one file to another ( ProRes only ):
It's similar to Frame Editor, but you can replace long sections. You load source and target files. Set IN/OUT for both and hit Apply.
This will take IN/OUT section from source and insert to target file starting from specified IN point there. Target OUT point is more important than IN, so if you set 5seconds for source, but only 3 for target then only 3 seconds will be inserted. App will take each frame and insert to target replacing original frame. Due to VBR nature of ProRes frame will be encoded to exactly match size of the target frame. This means that you should not try to replace black frames (or fades) at target with "normal" video as you will get bad quality. For similar nature source/target footage it will all work absolutely fine. If you have (or not ) audio in your source file app will only replace video in the target.
Further notes from the author:
- there are not many sanity checks like fps or field order or chroma subsampling. In other words, it’s up to a user if he/she wants to replace 23.98 sequence with 29.97…
- Chroma subsampling: if Target and Source files have different chroma subsampling the source video will be decoded and chroma will be up/down sampled.
- Field Order: if Target and Source files have different field order the source video will be decoded and encoded back as it has the same field order (Note: If you insert interlaced video to progressive video will be encoded as progressive but without deinterlacing)
ProRes Frame Metadata, and Timecode tabs have own Apply buttons, where others have Apply button in the right, bottom corner (so you need to press it). You can then Eject file and open again to check if changes have been made. Because tool works mainly instantly when you press Apply it's basically done. It's bit strange at the begging as you are not sure if it's done or not
One more time- treat tool as a BETA and copy all source file before making adjustments.
There are many more features planned.
Please report bugs, desired features etc. The more feedback the faster app will become stable and even more useful.
Last edited by Andrew Kolakowski on Thu Apr 23, 2020 8:02 pm, edited 9 times in total.


