How to display the keyframe editor on Edit page?

Get answers to your questions about color grading, editing and finishing with DaVinci Resolve.
  • Author
  • Message
Offline

magicmoo

  • Posts: 52
  • Joined: Thu Aug 19, 2021 10:07 pm
  • Location: UK
  • Real Name: Mark Allison

How to display the keyframe editor on Edit page?

PostSun Oct 24, 2021 2:42 pm

In Davinci Resolve 17.4 on Windows 10, I have added some key frames to a still image clip and I want to smooth the keyframes but the key frame editor is not showing.

If I select my clip:
2021-10-24_15-33-24.jpg
2021-10-24_15-33-24.jpg (185.02 KiB) Viewed 44120 times


Then I go to the Clip menu and choose Show keyframe editor, nothing happens.
2021-10-24_15-37-48.jpg
2021-10-24_15-37-48.jpg (102.61 KiB) Viewed 44120 times
Windows 11 | Davinci Resolve Studio 20
Offline
User avatar

TheBloke

  • Posts: 1905
  • Joined: Sat Nov 02, 2019 11:49 pm
  • Location: UK
  • Real Name: Tom Jobbins

Re: How to display the keyframe editor on Edit page?

PostSun Oct 24, 2021 2:51 pm

Click the two little black icons you see in the bottom right corner of each clip, in the orange area of those clips.

Image
Resolve Studio 17.4.3 and Fusion Studio 17.4.3 on macOS 11.6.1

Hackintosh:: X299, Intel i9-10980XE, 128GB DDR4, AMD 6900XT 16GB
Monitors: 1 x 3840x2160 & 3 x 1920x1200
Disk: 2TB NVMe + 4TB RAID0 NVMe; NAS: 36TB RAID6
BMD Speed Editor
Offline

magicmoo

  • Posts: 52
  • Joined: Thu Aug 19, 2021 10:07 pm
  • Location: UK
  • Real Name: Mark Allison

Re: How to display the keyframe editor on Edit page?

PostSun Oct 24, 2021 2:56 pm

TheBloke wrote:Click the two little black icons you see in the bottom right corner of each clip, in the orange area of those clips.


Thanks, that was the first thing I did but nothing happens when I click the right one, that's the keyframe editor, right?
Windows 11 | Davinci Resolve Studio 20
Offline
User avatar

TheBloke

  • Posts: 1905
  • Joined: Sat Nov 02, 2019 11:49 pm
  • Location: UK
  • Real Name: Tom Jobbins

Re: How to display the keyframe editor on Edit page?

PostSun Oct 24, 2021 2:58 pm

Right one shows the position of keyframes relative to the clip:

Image

Left one shows the full curve edit:

Image

If I was only going to click one, I'd click the left.

If they're not working then I'm not sure - you definitely have keyframes on that clip? Inspector diamonds showing red? If so, sounds like a bug.
Resolve Studio 17.4.3 and Fusion Studio 17.4.3 on macOS 11.6.1

Hackintosh:: X299, Intel i9-10980XE, 128GB DDR4, AMD 6900XT 16GB
Monitors: 1 x 3840x2160 & 3 x 1920x1200
Disk: 2TB NVMe + 4TB RAID0 NVMe; NAS: 36TB RAID6
BMD Speed Editor
Online

panos_mts

  • Posts: 1220
  • Joined: Mon Oct 21, 2019 3:18 pm
  • Real Name: Panagiotis Vellios

Re: How to display the keyframe editor on Edit page?

PostSun Oct 24, 2021 3:20 pm

Keyframe editor is not working with OpenFX keyframes, you need to use the curve editor.
Offline

magicmoo

  • Posts: 52
  • Joined: Thu Aug 19, 2021 10:07 pm
  • Location: UK
  • Real Name: Mark Allison

Re: How to display the keyframe editor on Edit page?

PostSun Oct 24, 2021 3:22 pm

There are definitely keyframes because I added a Transform effect to move the image across the screen and it moves fine. I just want to ease it in and out.

2021-10-24_16-20-58.jpg
2021-10-24_16-20-58.jpg (453.66 KiB) Viewed 43850 times
Windows 11 | Davinci Resolve Studio 20
Offline
User avatar

TheBloke

  • Posts: 1905
  • Joined: Sat Nov 02, 2019 11:49 pm
  • Location: UK
  • Real Name: Tom Jobbins

Re: How to display the keyframe editor on Edit page?

PostSun Oct 24, 2021 3:27 pm

Ah yeah it's what panos said - that's an OFX, not an Inspector transform control. That's a limitation at the moment, they don't appear in the keyframe pane.

But you can see them in the curve pane - you need to select them using the down arrow in the top left, like I've done here for the Transform OFX Zoom and Position X
Image

Image Image
Resolve Studio 17.4.3 and Fusion Studio 17.4.3 on macOS 11.6.1

Hackintosh:: X299, Intel i9-10980XE, 128GB DDR4, AMD 6900XT 16GB
Monitors: 1 x 3840x2160 & 3 x 1920x1200
Disk: 2TB NVMe + 4TB RAID0 NVMe; NAS: 36TB RAID6
BMD Speed Editor
Offline

magicmoo

  • Posts: 52
  • Joined: Thu Aug 19, 2021 10:07 pm
  • Location: UK
  • Real Name: Mark Allison

Re: How to display the keyframe editor on Edit page?

PostSun Oct 24, 2021 3:43 pm

Great thanks, I can see them now, how do I smooth the curve out?
2021-10-24_16-41-54.jpg
2021-10-24_16-41-54.jpg (241.08 KiB) Viewed 43821 times
Windows 11 | Davinci Resolve Studio 20
Offline
User avatar

TheBloke

  • Posts: 1905
  • Joined: Sat Nov 02, 2019 11:49 pm
  • Location: UK
  • Real Name: Tom Jobbins

Re: How to display the keyframe editor on Edit page?

PostSun Oct 24, 2021 3:49 pm

You can't. Not supported on OFX. There's a feature request thread: viewtopic.php?f=33&t=149306
Resolve Studio 17.4.3 and Fusion Studio 17.4.3 on macOS 11.6.1

Hackintosh:: X299, Intel i9-10980XE, 128GB DDR4, AMD 6900XT 16GB
Monitors: 1 x 3840x2160 & 3 x 1920x1200
Disk: 2TB NVMe + 4TB RAID0 NVMe; NAS: 36TB RAID6
BMD Speed Editor
Offline
User avatar

TheBloke

  • Posts: 1905
  • Joined: Sat Nov 02, 2019 11:49 pm
  • Location: UK
  • Real Name: Tom Jobbins

Re: How to display the keyframe editor on Edit page?

PostSun Oct 24, 2021 3:56 pm

By the way, do you need to use the Transform OFX? Can't you use the Inspector Transform controls instead? They support curved keyframes on Edit. Do you want the Motion Blur or something like that?

Alternatively you could go into Fusion on that clip and add the OFX there instead, then use the Spline Editor where you'll have full control over keyframe curves. Or just use Fusion's default Transform tool, which supports motion blur.
Resolve Studio 17.4.3 and Fusion Studio 17.4.3 on macOS 11.6.1

Hackintosh:: X299, Intel i9-10980XE, 128GB DDR4, AMD 6900XT 16GB
Monitors: 1 x 3840x2160 & 3 x 1920x1200
Disk: 2TB NVMe + 4TB RAID0 NVMe; NAS: 36TB RAID6
BMD Speed Editor
Offline

magicmoo

  • Posts: 52
  • Joined: Thu Aug 19, 2021 10:07 pm
  • Location: UK
  • Real Name: Mark Allison

Re: How to display the keyframe editor on Edit page?

PostSun Oct 24, 2021 5:43 pm

TheBloke wrote:By the way, do you need to use the Transform OFX? Can't you use the Inspector Transform controls instead? They support curved keyframes on Edit. Do you want the Motion Blur or something like that?

Alternatively you could go into Fusion on that clip and add the OFX there instead, then use the Spline Editor where you'll have full control over keyframe curves. Or just use Fusion's default Transform tool, which supports motion blur.

Thanks, yeah I need it because I'm making the image 0.9x but with Dynamic Zoom. I will look into the fusion option.

See this thread viewtopic.php?f=21&t=148319
Windows 11 | Davinci Resolve Studio 20
Offline

Joe Cool

  • Posts: 44
  • Joined: Tue Dec 12, 2023 9:11 am
  • Real Name: Juergen Jeibmann

Re: How to display the keyframe editor on Edit page?

PostWed Dec 25, 2024 8:25 am

I want to check my keyframes in several clips of my timeline. Actually I have to open the editor individually for every clip. Is there a way to open the editor for multiple clips in one step?
The reverse way seems to be a klick with the option modifier that closes all editors. But how to open them all?
Offline
User avatar

KrunoSmithy

  • Posts: 4562
  • Joined: Fri Oct 20, 2023 11:01 pm
  • Warnings: 1
  • Real Name: Kruno Stifter

Re: How to display the keyframe editor on Edit page?

PostWed Dec 25, 2024 5:00 pm

Joe Cool wrote:I want to check my keyframes in several clips of my timeline. Actually I have to open the editor individually for every clip. Is there a way to open the editor for multiple clips in one step?
The reverse way seems to be a klick with the option modifier that closes all editors. But how to open them all?


I think you have to work on clip by clip basis if you want to adjust keyframe editor or keyframe splines. Unless of course they are one clip, such as compound clip or for example adjustment clip, which can affect what is bellow it, for multiple clips and one inspector panel.

You can copy and paste keyframes by using copy and paste attributes option with ability to keep the timing of original or stretch to fit, and you can add them automatically as you play, but I think like inspector and keyframing, you can only do it at one clip at the time.

If you use adjustment clip, compound clip, or possibly fusion reference composition or fusion clip, or nested timeline, beforehand, than you can treat it as one clip for multiple clips, otherwise its limited to one inspector panel with keyframes per clip. Unless I'm missing something.
Offline

Joe Cool

  • Posts: 44
  • Joined: Tue Dec 12, 2023 9:11 am
  • Real Name: Juergen Jeibmann

Re: How to display the keyframe editor on Edit page?

PostThu Dec 26, 2024 12:39 pm

Hello Kruno,

thank you for your detailed information that helped me a lot.
I agree that I have to work on a clip by clip basis and this is fine for me.
But is there a way to open the Keyframe Editor for multiple clips in one step. To collapse them with one click is possible by using the modifier key alt+click. I want to go in the other direction and open more than one Keyframe Editor Bar.

Let me ask another question if you time allows it. I often copy a clip from one track into another by moving the clip with the mouse and holding alt-key. This method can lead to minimal inaccuracy if perhaps there ist another clip to align with a minor different length. (Perhaps a not perfect aligned audio clip.)
Is there a way to just use the keyboard? Alt-key in combination with the up/down arrows moves the clip in vertical direction. Is there a way to use this function in combination with copying the clip.
I hope I described it good enough ;-).
Offline
User avatar

KrunoSmithy

  • Posts: 4562
  • Joined: Fri Oct 20, 2023 11:01 pm
  • Warnings: 1
  • Real Name: Kruno Stifter

Re: How to display the keyframe editor on Edit page?

PostThu Dec 26, 2024 1:56 pm

Joe Cool wrote:But is there a way to open the Keyframe Editor for multiple clips in one step. To collapse them with one click is possible by using the modifier key alt+click. I want to go in the other direction and open more than one Keyframe Editor Bar.


I am not aware if such a feature exists in the edit page. I was not able to find it myself. Probably because most of the controls are designed to work on clip by clip basis, like the inspector panel, overlay controls in the viewer etc.

I think that is one of the reasons they added adjustment clip as a feature so multiple clips can be adjusted at once. Of course it has its limitations. It only affect the layers that are composited on top most track but bellow adjustment clip and I don't think transparency works.

Maybe there is some way with some control panel that can do more than keyboard, but I don't have access to it.

I suppose if you wanted to adjust multiple keyframes on multiple clips, you would either use copy and paste attributes if its just same adjustments. And if its differnt or needs to keyframes across multiple clips, you would use adjustment clip or put the clips into compound clip and than use keyframes on that.

You can of course also use fusion, either by using fusion clips or by using fusion composition and adding multiple clips from media pool in the composition.

.....................................................................

By the way in the edit page keyframe editor or keyframe splines, to duplicate one or more keyframes: Make a selection of keyframes, then hold the Option key down and drag the selected keyframes to duplicate them and move the duplicates to a new position.

Also less known feature I think is the ability to open keyframe editor, and you get essentially a usually transform set of keyframes, which represents transform section in the inspector. So this could be rotate, zoom, position X or Y. To get access to individual keyframes and parameters, there is a little downword pointing arrow at the far right of the clip, and if you open that, you get quick list view of all the parameters that were changed with all the keyframes that can be easily manipulated.

Sometimes people ask how to move the keyframes in the spline view. Especially if you want to move them only on one axis. There are several ways. You can move them incrementally and precisely in the inspector panel by moving the mouse over the number and than moving the mouse left or right. You can enter precise number, or you can go to keyframe editor and open that list view of keyframes and move them around. Also less known is that there are keyframe shorcuts that you can assign to move the keyframes up, down, left or right.
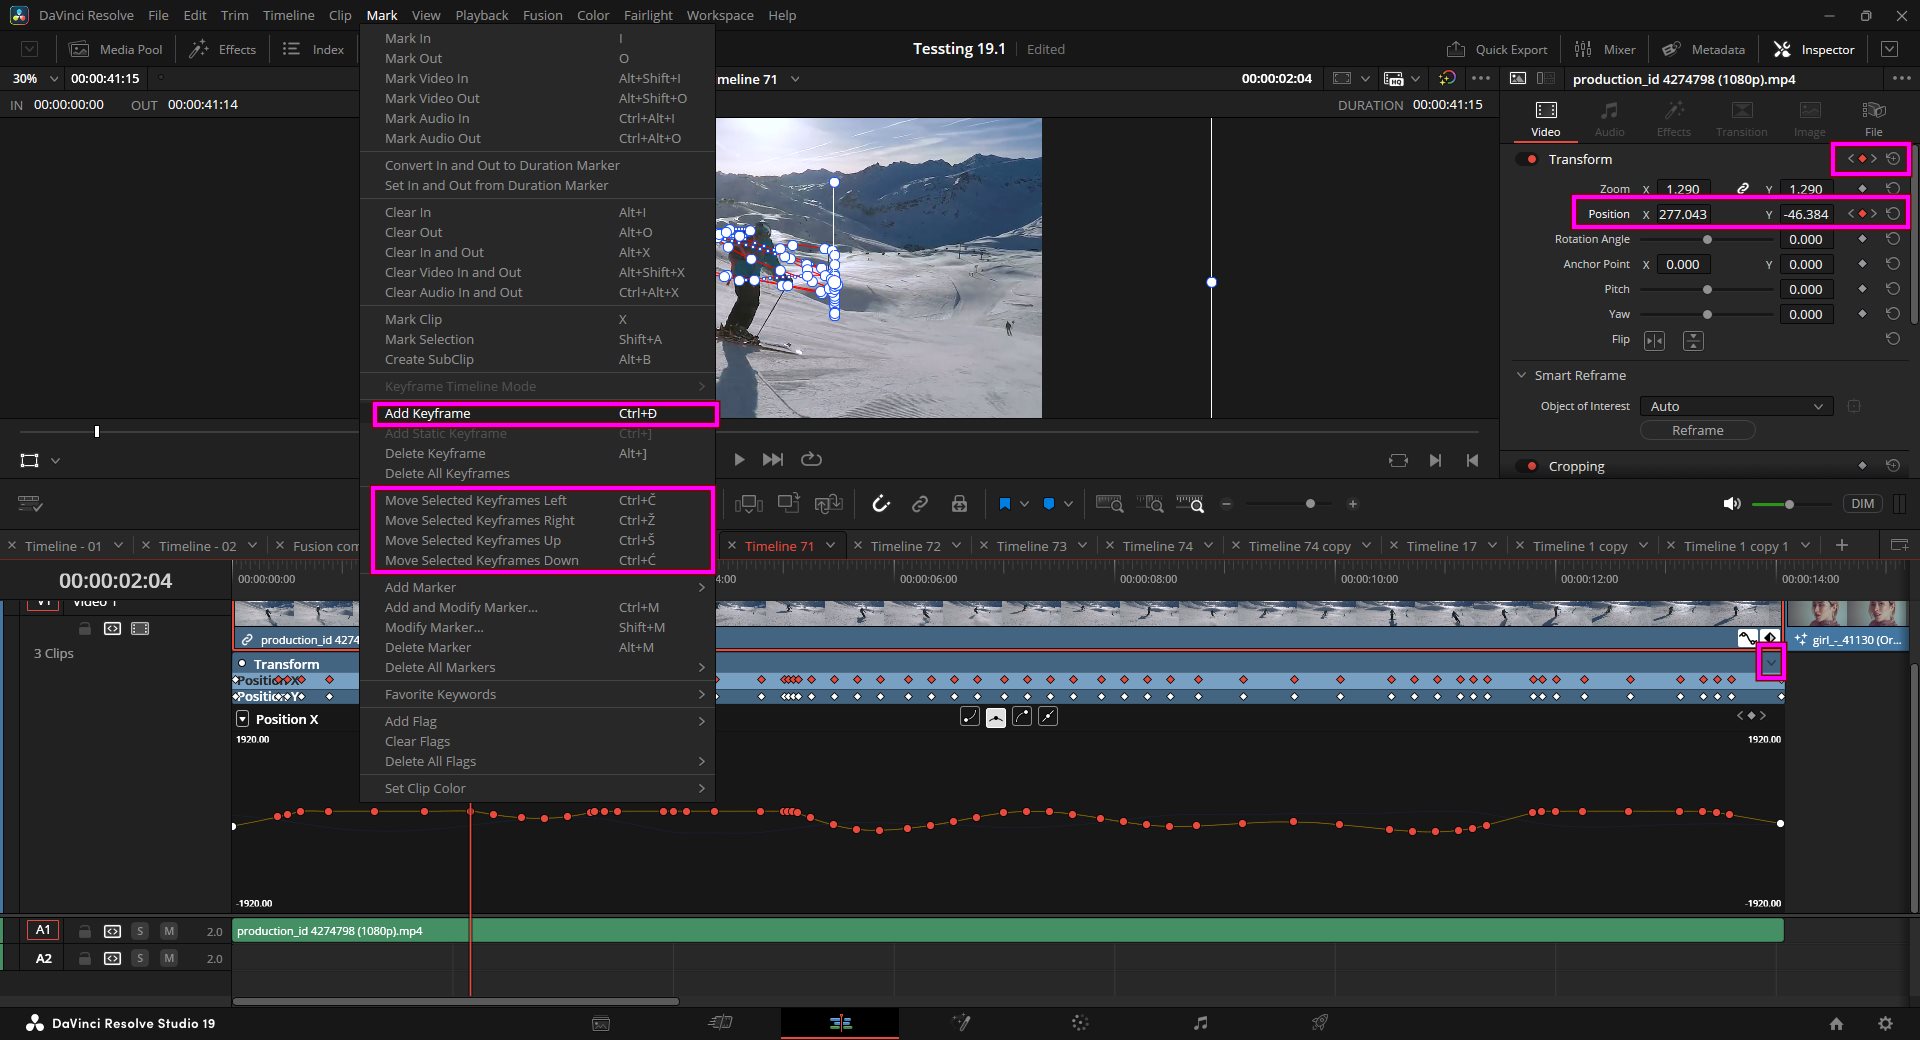
sshot-1608.jpg
sshot-1608.jpg (252.07 KiB) Viewed 19044 times


You can also select multiple keyframes and change easeing, but sadly we can't do it for speed points, which would be nice to have.

sshot-1609.jpg
sshot-1609.jpg (23.96 KiB) Viewed 19044 times


But if you work with speed point in the cut page, you can click on them with easy to apply easing options.
.....................................................................

There is also a really interesting feature for adding dynamic but context sensitive keyframes even when you play trough the timeline.

There is a shortcut to add keyframe. Basically, whatever your last slider that you used; maybe zoom or rotate when you press shortcut for keyframe, even when video is playing or when its static, it will add a keyframe for that slider. If you used zoom or transform or rotate last, it will add keyframe for the last used slider, unless there is no ability to add and than it will try to add next logical one. It will also work on speed controls. So you can add speed points that way too.

Its interesting because you don't have to worry too much about keyboard shortcuts, just one shortcut. And than after it adds keyframes, you can go in the second pass and using the methods I mentioned earlier, including keyboard shortcuts for moving keyframes, you can easily move them to position with already selected parameters. Its actually quite useful when you get used to it. Not sure if you knew about that. I just figured it out the other day, myself.


Joe Cool wrote:Let me ask another question if you time allows it. I often copy a clip from one track into another by moving the clip with the mouse and holding alt-key. This method can lead to minimal inaccuracy if perhaps there is another clip to align with a minor different length. (Perhaps a not perfect aligned audio clip.)

Is there a way to just use the keyboard? Alt-key in combination with the up/down arrows moves the clip in vertical direction. Is there a way to use this function in combination with copying the clip.
I hope I described it good enough ;-).


I did find a duplicate item keyboard shortcut but not sure how to use it yet. Perhaps you can figure out it when you have the time.
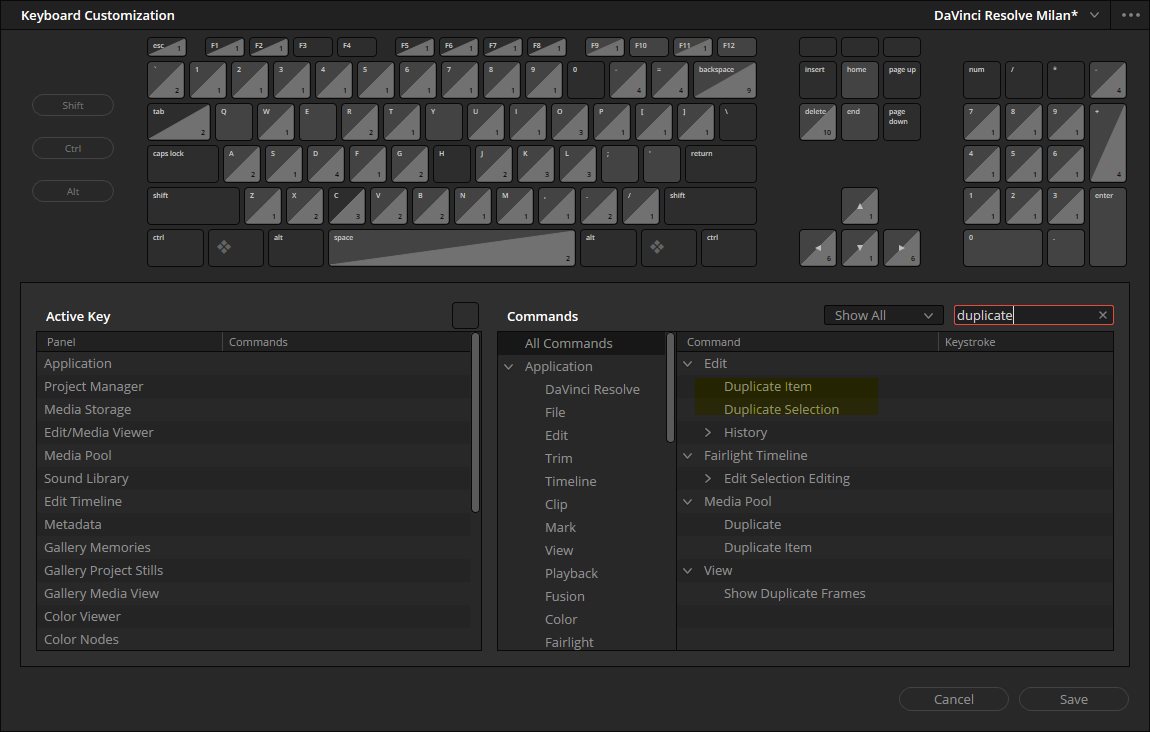
sshot-1607.jpg
sshot-1607.jpg (99.74 KiB) Viewed 19044 times


Usually I have snap feature active to ensure clips snap to something. If its not accurate enough you can always re-adjust it or trim it after you duplicate or move it. there are many ways to be very precise.

You can also copy a clip and than depending on where you auto selectors are, you can paste it very precisely.

All copied clips will be pasted to the lowest numbered track with Source Control enabled. If all tracks of a particular type have their Auto Select controls turned off, then no clips of that type will be pasted at all. Tracks with Auto Select turned off will not be rippled or affected by clips being pasted via a Paste Insert command.

You can also trim and adjust clips if they slide from the intended positions and you can nudge audio quite precisely too, if you need to. But usually if the audio is offset form original clip that is linked to, red numbers appear showing how much is offset so its easy to get it into position. And I think there is also keyboard shortcut for it, but I'm not sure.

Hope that helps you with some of the things you are doing. If you are working with animations a lot, fusion is probably better option, and if you are keyframing audio, fairlight offers a lot more, of course, but for basic stuff edit page is good enough I think. For more than one clip adjustments, adjustment clip is probably the most logical option.
Offline
User avatar

GabrieleLS

  • Posts: 7
  • Joined: Tue Aug 18, 2020 3:29 pm
  • Real Name: Gabriele Lo Surdo

Re: How to display the keyframe editor on Edit page?

PostSun May 25, 2025 10:44 am

A video tutorial relevant to the topic (if you are using DaVinci Resolve 20):

Offline
User avatar

Sean Nelson

  • Posts: 891
  • Joined: Sun Feb 07, 2021 9:48 pm
  • Location: Vancouver, Canada
  • Real Name: Sean Nelson

Re: How to display the keyframe editor on Edit page?

PostSun May 25, 2025 6:41 pm

GabrieleLS wrote:A video tutorial relevant to the topic (if you are using DaVinci Resolve 20):

Yes, for folks stumbling across this topic a major change in Resolve 20 is the addition of a keyframe panel that you can display on the Edit page. It's similar to what's available on the Fusion page and gives you a lot more control than the small dropdown "curve editor" window in the timeline.
DR Studio 19.1.4 Build 11, Win10Pro x64 22H2/19045.5608
Asus C246 Pro Motherboard, Xeon E-2278G@3.4GHz, 64GB ECC RAM
GeForce 3060 12GB, "Studio" driver 560.81
OS,Library: 1TB NVMe SSD - Project,Cache: 1TB NVMe SSD

Return to DaVinci Resolve

Who is online

Users browsing this forum: Google [Bot], panos_mts and 330 guests